Description
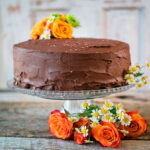
The secret ingredient in this chocolate cake is the zucchini. No one will ever know it’s in there unless you tell them. Shhhhhh it’s just between us.
Ingredients
Scale
- 250 g (2 cups) all purpose flour (spoon and level)
- 50 g (1/2 cup) cocoa
- 15 g (1/4 cup) black cocoa
- 2 tsp baking soda
- 1/2 tsp baking powder
- 1 tsp espresso powder
- 1/2 tsp salt
- 240 ml ( 1 cup) vegetable oil
- 250 g (1 1/4 cups) granulated sugar
- 100 g light corn syrup
- 4 large eggs, room temperature
- 80 g (1/3 cup) plain greek yogurt or sour cream
- 1 tbsp vanilla extract
- 450 g (3 cups) shredded zucchini (about 2 medium)
- 180 g (1 cup) chocolate chips. I used semi sweet.
Frosting Ingredients:
- 284 g (2 1/2 sticks) unsalted butter
- 50 g (1/2 cup) cocoa
- 15 g (1.4 cup) black cocoa
- 420 g (3 1/2 cups) confectioner’s sugar
- 1/4 tsp salt
- 1 tsp vanilla bean paste
- 60 ml (1/4 cup) heavy cream
Instructions
To Make the Cake:
- Preheat oven to 350 degrees F or 177 degrees C. Grease and flour using cocoa two 9×2 round cake pans. These are 9″ round pans and 2″ high. Set prepared pans aside.
- Sift flour, cocoa powders, baking soda, baking powder, espresso powder, and salt together into a large bowl. Set Aside
- In another bowl, beat the oil, granulated sugar, corn syrup, eggs, greek yogurt, vanilla. Add the ingredients one at a time in the order listed, mixing thoroughly before adding the next. To beat, either use a hand mixer or a stand mixer fitted with the paddle attachment and use the medium high setting.
- Add zucchini and mix until well combined.
- Spoon in dry ingredients and beat together on medium speed low until well combined.
- Fold in chocolate chips.
- Batter will be pretty thick.
- Pour batter evenly between the two cake pans. Bake for 40-45 minutes or until cakes are baked through. To test for doneness, insert a toothpick into the center portion of the cake. When the toothpick comes out clean, the cake is done. Ovens vary widely, so keep an eye on your cakes!
- When done, remove from the oven and allow cakes to cool completely in the pans set on a wire rack. When cool carefully flip cakes out of the pans an onto a plate or cutting board. If finishing the cake immediately, proceed to the assembly instructions.
- If you are waiting to finish the cakes, place each one in it’s own ziplock bag and store in the fridge over night. You can frost and decorate the next day if desired.
To Make the Frosting:
- Cream the butter on medium high using a paddle attachment for 4-5 minutes. You are looking for the butter to turn white. This is how I make buttercream frosting.
- Sift the confectioner’s sugar, cocoas and salt together.
- Turn off them mixer and add dry ingredients to whipped butter. Run mixer on low speed to incorporate sugar and then . Then beat 3-5 minutes.
- Add vanilla.
- Add cream.
- Once all the dry ingredients and vanilla and cream have been incorporated, put the mixer up to high speed and beat mixture for another 3-4 minutes.
- At this point turn the mixer off and assess the frosting. If it’s too thin add 1-2 more tbsp on confectioner’s sugar and if it’s too thick, add 1-2 tbsp of cream. If you added anything, make sure to incorporate it well.
- Frost cake either with preferred method.
Assembly:
-
- To get cakes completely flat for better stacking, use a serrated knife and slice off thin layers for the tops. You are just removing the mounded portion so the cake is perfectly flat.
- Place on cake layer onto the cake stand or plate you will be serving from. Evenly cover the top with frosting. Go a little thick on this part.
- Place the second layer on top of the frosted top.
- Use the remaining frosting to finish the top and sides of the cake. An offset spatula works wonders on this.
- To finish, pipe decorative elements or sprinkle with chocolate chips or some other colorful sprinkle.
- Slice and serve!
- Cover your leftovers and store in the fridge for up to 5 days.
Notes
This cake is a lot of steps and a lot of ingredients! So take your time with it. I find splitting up the baking of the cakes from the making of the frosting and assembly helps. If you take it one step at a time, you can do this! And if you are an old pro, then you will find this a rather easy, but supremely delicious cake to put together!
This recipe is lovingly adapted from my favorite baking blogger Sally’s Baking Addiction.
