Description
Few cakes are as famous as the one in today’s post. Created by Christina Tosi, let’s take a look at the Momofuku Milkbar Birthday Cake recipe.
Ingredients
Scale
Birthday Cake Crumbs
- 1/2 cup (100 g) granulated sugar. I used superfine sugar.
- 1 1/2 tbsp (25 g) tightly packed light brown sugar
- 3/4 cup (90 g) cake flour
- 1/2 tsp (2 g) baking powder
- 1/2 tsp (2 g) kosher salt. I used Fleur de Sel.
- 2 tbsp (20 g) rainbow sprinkles
- 1/4 cup (40 g) grapeseed oil
- 1 tbsp (12 g) clear vanilla extract
Birthday Cake Soak
- 1/4 cup (55 g) Milk. I used the buttermilk I already had on hand.
- 1 tsp (4 g) clear vanilla extract
Milkbar Birthday Cake
- 4 tbsp (55 g) room temp butter
- 1/3 cupe (60 g) shortening
- 1 1/4 cups (250 g) superfine sugar
- 3 tbsp (50 g) light brown sugar
- 3 eggs
- 1/2 cup (110 g) buttermilk
- 1/3 cup (65 g) grapeseed oil
- 2 tsp (8 g) clear vanilla extract
- 2 cups (245 g) cake flour
- 1 1/2 tsp (6 g) baking powder
- 3/4 tsp (3 g) kosher salt
- 1/4 cup (50 g) rainbow sprinkles
Birthday Cake Frosting
- 8 tbsp (115g) room temp butter
- 1/4 cup (50 g) shortening
- 2 ounces (55 g) cream cheese
- 1 tbsp (25 g) glucose
- 1 tbsp (18 g) corn syrup
- 1 tbsp (12 g) clear vanilla extract
- 1 1/4 cups (200 g) powdered sugar
- 1/2 tsp (2 g) kosher salt
- Pinch (.25 g) baking powder
- Pinch (.25 g) citric acid, but I used a 1/4 tsp lemon extract
Instructions
Birthday Cake Crumbs
- Pre heat oven to 300 degrees F.
- Combine first 6 ingredients in the bowl of a stand mixer fitted with a paddle attachment. Run mixer on low to combine the ingredient, maybe a minute.
- Whisk oil and vanilla and while mixer is running on low drizzle down the side of the bowl.
- Mix until clusters form.
- Spread clusters on the sheet pan lined with parchment paper and bake 20 minutes.
- Allow Crumbs to cool completely before using. They will keep at room temp in an air tight container for a week or in the freezer for a month.
Birthday Cake Soak
- Whisk milk and vanilla together and set aside.
Birthday Cake Layers
- Preheat oven to 350 degrees F.
- Combine butter, shortening, sugars and vanilla in the bowl or a stand mixer fitted with the paddle attachment. Cream on medium high for 3 minutes.
- Scrape down the bowl and add eggs one at a time allowing them to incorporate and turn mixer up to medium high. Beat in eggs for 2 – 3 minutes.
- Whisk together buttermilk and oil. Turning mixer to low speed, slowly stream in liquid. Once all the liquid is in the bowl, increase speed to medium and run for 4 – 6 minutes. Mixture will turn white and be twice its original size. Do not skimp on this mixing time because it’s how you force the creamed mixture to accept the liquid. When no streaks remain, stop mixer and scrape down the sides.
- With mixer off add dry ingredients and sprinkles. Turn mixer to low speed and run until dry ingredients are just incorporated, maybe 60 seconds.
- Divide mixture evenly across 3 prepared 6″ cake pans and bake 30 -35 minutes. Check for it being fully baked by the spring back method or insert a wooden skewer.
- When done put on cake rack to cool 10 minutes in the pan before turning out. Allow turned out cakes to cool completely to room temperature.
- Finish cake assembly or do as I suggest above and put the layers in an air tight container and let them rest in the fridge over night.
Birthday Cake Frosting
- Combine the butter, shortening and cream cheese in a large bowl on a stand mixer fitted with a paddle attachment. Beat on medium speed until fluffy and well combined. About 3 minutes.
- Scrape down bowl. Turn mixer to low speed and stream in the glucose, corn syrup, lemon extract and vanilla. Turn mixer to medium high and beat mixture another 3 minutes. It should be a smooth glossy white mixture.
- Scrape down bowl, add half the dry ingredients and run mixer on low until combined. Stop mixer, scrape down sides and add remaining dry ingredients. Run mixer on low speed until all the sugar is incorporated and then turn mixer to medium high speed and beat 3 minutes.
Assembly
- Prep the cake layers: Use the cake ring to carefully shave off the edges of the cake layers to to expose the cake underneath the sugar crust. Using the cake ring and working your way around keeps the cake round. Use a cake leveler to level the layers and have them uniform. It looks so much better when the layers are all the same.
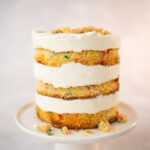
- Assemble the cake: pop a layer into the springform and acetate container. Brush the top of the layer using the pastry brush with the cake soak. Apply some frosting using the bent spoon. Smooth the frosting all the way to the edges. Sprinkle some cake crumbs. Add a little more frosting. Repeat with the next layer. For the top layer, apply cake soak, frosting and then sprinkle cake crumbs in a lavish manner on top. This is your decoration for the cake, so have fun with it.
- Freeze: Once the cake is assembled, leave it sitting on the sheet pan and move it into the freezer. Let it set up at least 4 hours, but over night works. Christina recommends 12 hours, but I thought it was fine at 4 hours.
Notes
I used the recipe from the original Momofuku Milkbar cookbook, but the recipe also appears on the official Milkbar website.
The full instructions for how I assembled the cake are in the body of the blog post. So carefully read and reread those instructions.
I like a LOT of frosting, so I doubled the frosting recipe as it’s given on this card. I wanted to convey Christina’s recipe as she wrote it, but I personally doubled my frosting. I had some left over, but I never think of left over frosting as a bad thing.
- Prep Time: 3 hours
- Cook Time: 20
- Category: dessert
- Method: baking
- Cuisine: american