Peanut Butter Eggs
Peanut Butter Eggs are simple to make, and peanut butter is the perfect soft, sweet filling. Cover your Eggs in chocolate and you have perfection in a bite.
While most girls in my high school Home Ec class were there for an easy elective, I wound up falling in love. But not how you think.
This was the 1980s, and at that time only girls took home ec. Boys took wood shop. So no boys were around for that precious hour of the day, and it felt like freedom. We could sew and bake and take a break from High School drama. It was the best hour of my day. And where I discovered my love for making.
In class, we made simple food, including classic peanut butter eggs. I enjoyed this recipe so much, I made the eggs on my own, shared them around, and became the hit of my 11th grade class.
If you develop a reputation in 11th grade, being known as the girl who makes peanut butter eggs is not the end of the world

I hadn’t made Peanut Butter Eggs since 11th grade, but I have thought about them off and on since 1982 when we were first met.
Whoa. That’s almost 40 years. Kind of a long time to be thinking about peanut butter eggs.
When you make these, you’ll understand the obsession.

Here are my tips for success with this recipe:
- Weigh your ingredients to get the butters to sugar ratio just right. If there’s not enough powdered sugar, your eggs will be sticky, and they won’t set up as well.
- Don’t rush the chocolate dipping part of this. Refrigerate your eggs in between each step.
- Spring for candy melt pot. It’s easy to melt your chocolates, and it comes with the little extras that made this recipe come together so nicely in the end. Even if you only use it a few times a year, it’s worth it. I love mine and have had it for at least 15 years.
- Watch my full video tutorial on this recipe at the end of the post.
Tips for Decorating classic Peanut Butter Eggs!
- Dip the bottoms of the eggs into melted chocolate, and return them to a parchment lined pan. Put them back in the fridge for about 15 minutes.
- After chilling, set them up on a little grate thing (that came with my chocolate pot set), or a cooling rack, and pour the slightly cooled melted chocolate over each egg.
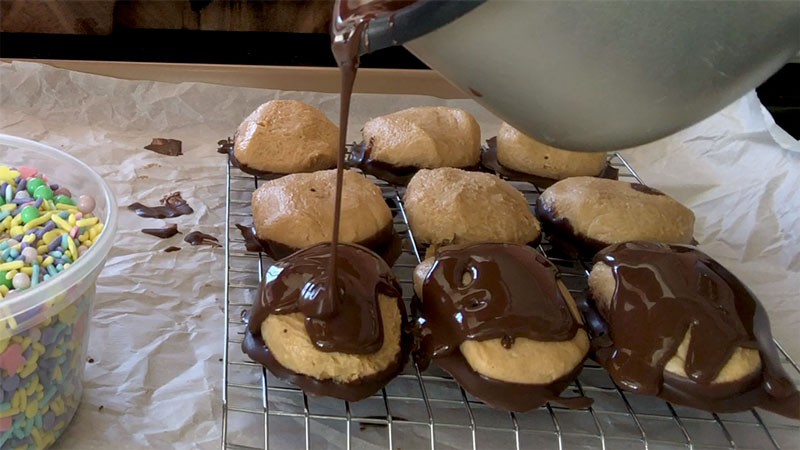
- Put on the sprinkles while they were still wet. Use candy melts or chocolate melts as opposed to chocolate chips. The chocolate sets up quickly, and retains a nice shine with deep, dark color.
- Watch the video to see an extra step I took to make sure the chocolate was easy to work with.

And yes. They taste as good, or better than this picture looks.
The peanut butter egg is creamy and tastes delicious with the crisp chocolate shell.
The mini bunnies and pastel colors in the sprinkles really pop on that dark brown coating.
Revisiting this recipe was like time travel back to a simpler time for me. I hope you will make chocolate dipped peanut butter eggs with your children, and have the same wonderful experience.
Enjoy the recipe with video showing complete instructions for making the Peanut butter Easter Eggs.
You might also like:
- How to make a cute pom pom bunny
- Cute Handmade Easter Bunny gift ideas
- More Easter Crafts
- How to dye easter eggs without food dye

Peanut Butter Easter Eggs
- Total Time: 30 minutes
- Yield: 9 1x
Description
Peanut Butter Easter Eggs covered in Chocolate.
Ingredients
- 1/2 cup or 120 grams creamy peanut butter
- 2 tbsp or 30 grams unsalted butter
- 1 tablespoon brown sugar
- 1 cup or 100 grams sifted powdered sugar
- 1 teaspoon vanilla extract (optional)
- 10 ounces chocolate melting wafers
- 1 teaspoon liquid coconut oil
- Sprinkles of your choosing for decorations
Instructions
- Using a mixer, combine the unsalted butter with the peanut butter until smooth.
- Add the brown sugar and vanilla (if using them) and mix until combined.
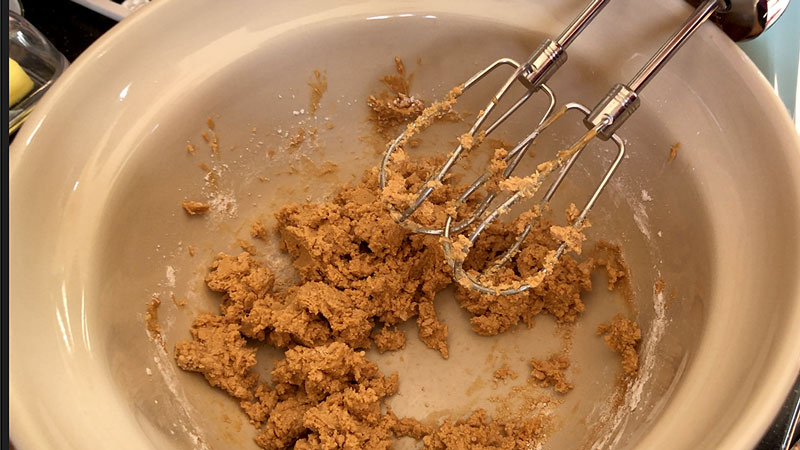
- Add the powdered sugar (icing sugar) in two additions mixing until no white streaks or lumps of white sugar appear in the bottom of the bowl. Scrape down your sides with a rubber spatula to make sure everything is combined.
- Mixture will be a bit crumbly as notated in the photo above. Don’t worry because it will come together when you shape the eggs.
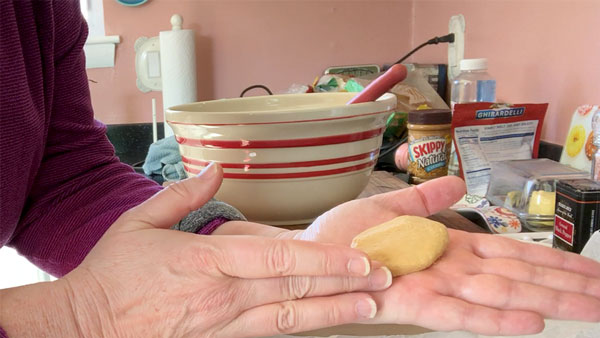
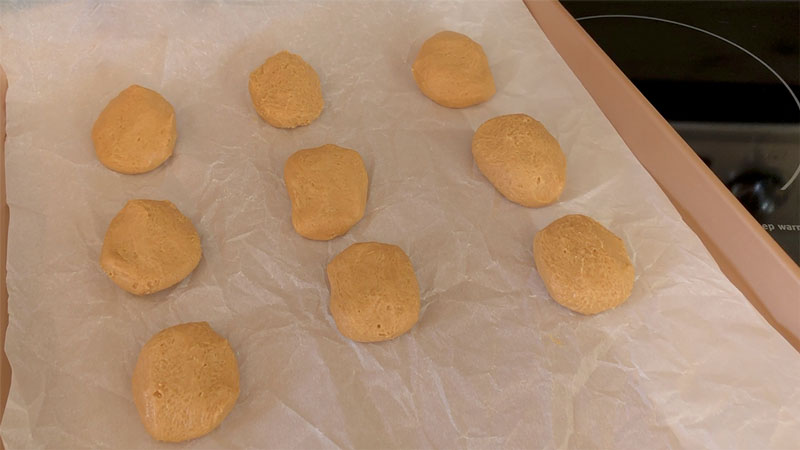
- Scoop out a tablespoon of egg mixture and roll it around in your hands. Pat it down and form it into the shape of an egg. Lay it on the prepared sheet pan lined with parchment paper. If the eggs leave a mess on your hands, return the egg to the bowl and mix in a little more powdered sugar. The eggs should not leave a mess on your hands if they have the proper amount of sugar in them.
- Once all of your eggs are shaped, pop them in the fridge. While they chill (about 15 minutes), melt your chocolate melts. I used a chocolate pot and chocolate melts so it was as easy as putting the wafers in the pot and turning it on. Add a little coconut oil at the beginning so it incorporates well. When everything is melted, stir until smooth. Remove the pot from the heat unit and allow it to cool off for 5 or 10 minutes.
- Take chilled eggs and using your fingers to hold them, dip only the bottoms into the chocolate. Once dipped put them back on the parchment lined pan, chocolate side down. Don’t worry. They won’t stick. When everybody’s bottom has been dipped, pop them back into the fridge for another 5 minute cool down.
- Set up the grate or a cooling rack would also work. Place chilled, bottom dipped eggs on the grate and pour the remaining melted chocolate over the top. Sprinkle the sprinkles right away, because the melts set up really fast.
- When all are covered and decorated, return to the fridge for about an hour.
- Serve right away! They can be kept in an air tight container in the refrigerator for a week or so, but I’m sure they won’t last that long.
Notes
I wrote this recipe using my own chocolate pot or candy melt pot, so if you don’t have one, use your preferred method of melting chocolate. But if I were you, I would use this recipe as the perfect excuse to get one of those chocolate pots right away.
Since we are going shopping anyway, pick up a digital food scale. Just do it. It makes your baking life 100% easier and more accurate. Once you switch to doing this, you will wonder why you waited so long.
This is not the time for the fancy peanut butter that has the oil floating on top. (why does it do that?) Use a garden variety, kid friendly, creamy version for this.
I used a 1 tablespoon cookie scoop to measure my eggs. I was able to get 9 out of this batch. But you could easily half those and wind up with 18 smaller eggs from this recipe.
This recipe is adapted from Sugar Spun Run. Sam is amazing.
- Prep Time: 15
- Cook Time: 15
- Category: Dessert
- Method: No Bake
- Cuisine: American


Hi there, I’m Patty.
Sewist, Baker, Maker
I love figuring out new ways to use pom poms, where I can stash more fabric, and I’m always wondering what to bake next…chocolate or lemon? When not dreaming up new things to make (or bake), I love riding my beach cruiser on the Boardwalk, escaping to mid week movie matinees, and planting new things in my tiny but mighty container garden.