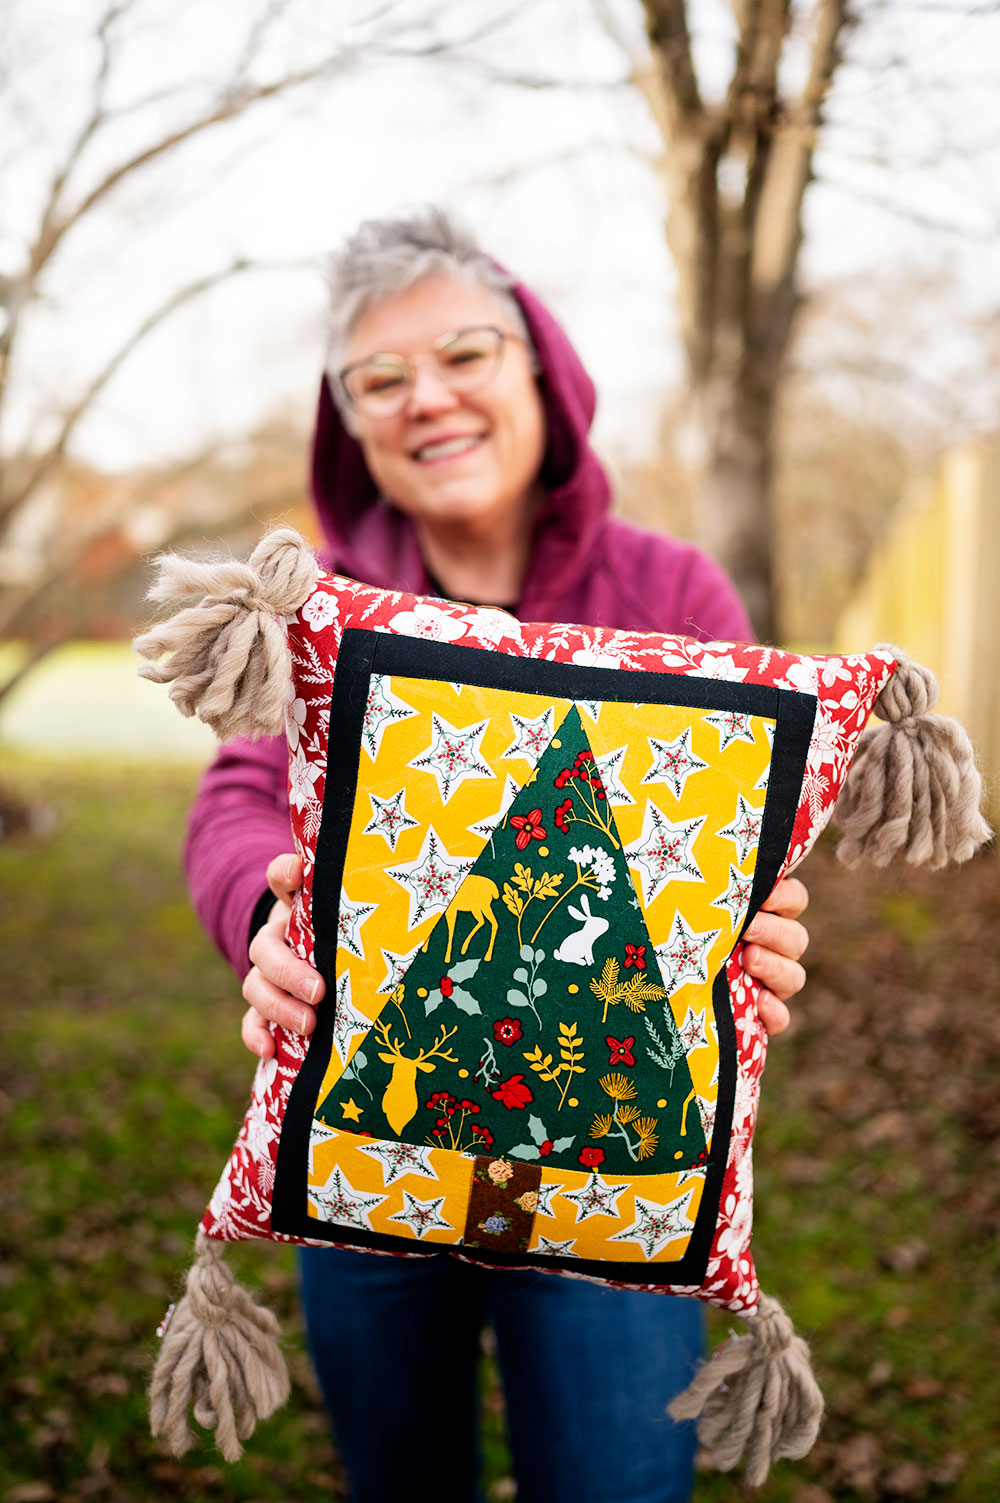
Quilted Pillow for Christmas
This post has affiliate links to products I use and love. If you buy something I can make a small commission, so thanks in advance. 🙂
One way to include seasonal decor is to piece a fun quilt block, and use it to make a quilted pillow for Christmas.
We’ve talked at length about the onerous process of constructing a full sized bed quilt. Don’t get me wrong, I see patterns every single day I would love to make. But oh the commitment. The commitment to the process is REAL, both in terms of time and finances. This is why I love small projects. We get to enjoy the quilt making craft without it requiring weeks and sometimes months to complete a project. It’s why I loved today’s project where we make a quilted a pillow for Christmas.
By mixing and matching fun prints in your fabric stash, it’s easy to create a quilted pillow you’ll love enough to leave out all year!
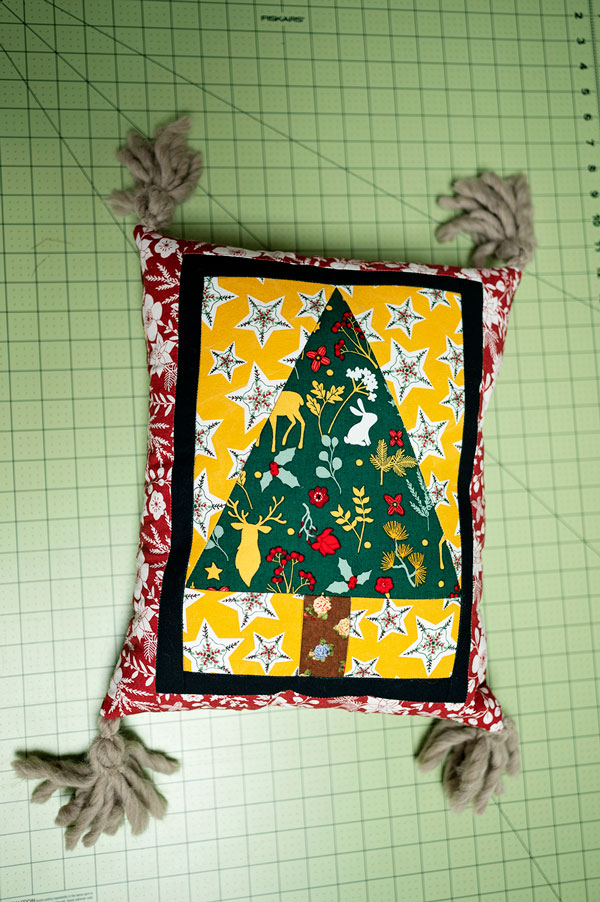
Even though I used a tree block, which is a design used to represent Christmas trees, I stayed away from overtly Christmassy prints and have a pillow I admire all year long. There is still the signature red and green we associate with Christmas, but because I stayed away from Santa or anything else over-the-top Christmas, I find that I can enjoy my pillow all year long.
Materials to construct the Quilted Pillow for Christmas:
- 5 coordinating Fat Quarters. This is a perfect project for fat quarter bundles.
- Two strips of solid fabric cut 1.5″ wide on WOF. I used black in the pictured project, but use what best frames your block
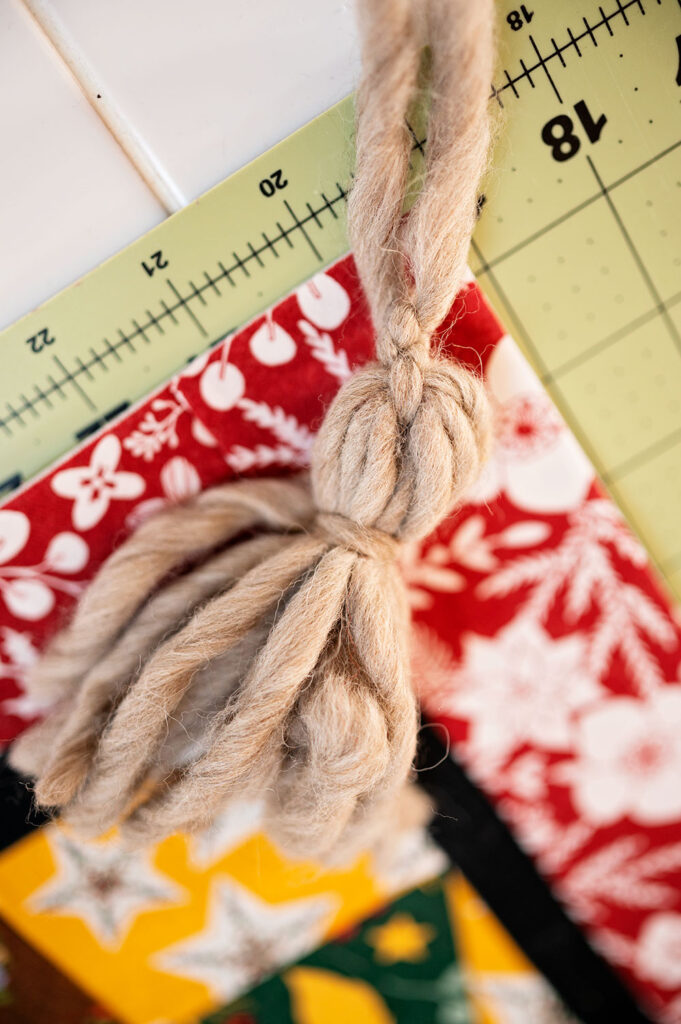
- Super bulky weight yarn to make tassels. Tassels are optional, but I love adding them to my pillow projects.
- Fusible quilt batting
- Medium weight interfacing
- Cotton 50 weight quilting thread
- Polyfil stuffing
- Embroidery floss

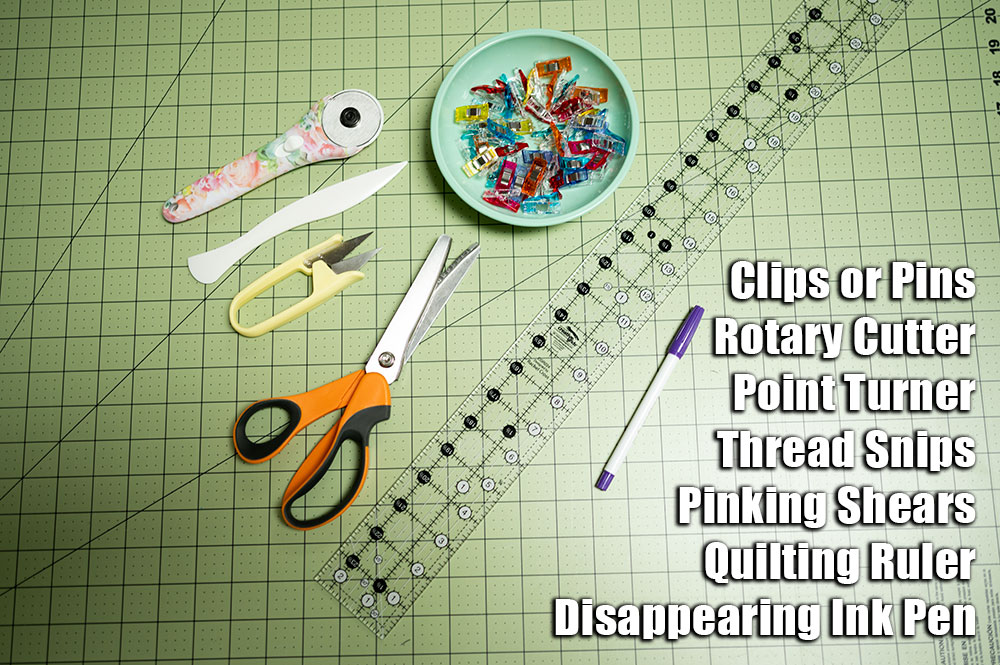
Tools to construct the Christmas Tree Quilted Pillow:
- Cutting mat to cut the fabric
- Wonder clips or Pins to secure the pieces for sewing
- Rotary cutter
- Quilting ruler. My current favorite is the 2.5″ by 24.5″ ruler from Creative Grids
- Point turner (actually this is if you make one of the projects I share using this block)
- Thread Snips
- Pinking Shears (this is for the projects we’ll explore later)
- Disappearing ink pen
- Sewing Machine
- 1/4″ presser foot
- All purpose presser foot
- Large embroidery needle
- Iron
- Ironing board or pressing mat
Tips and Tricks:
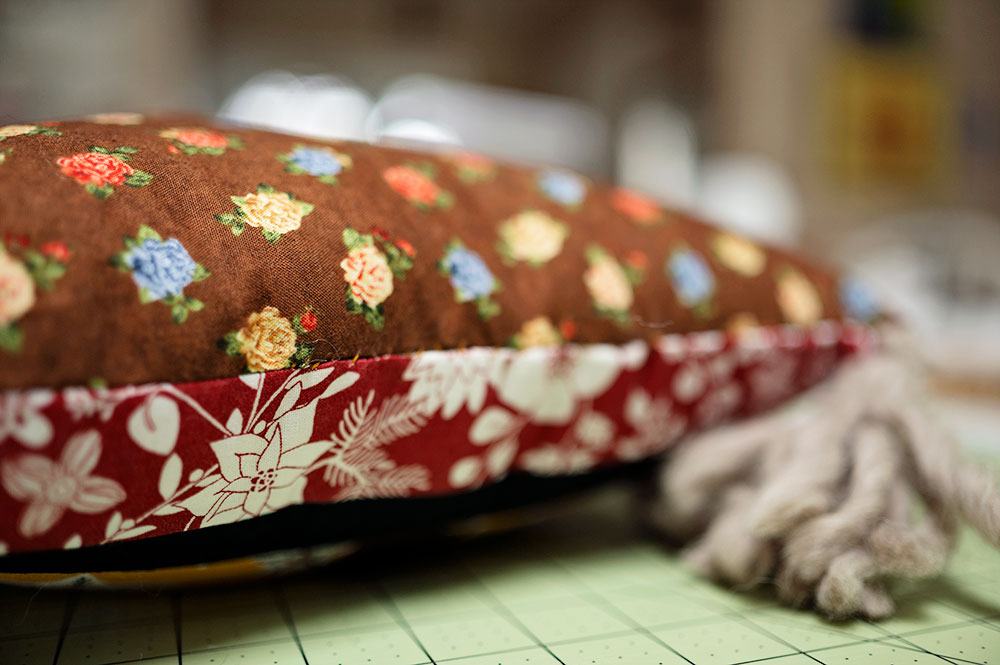
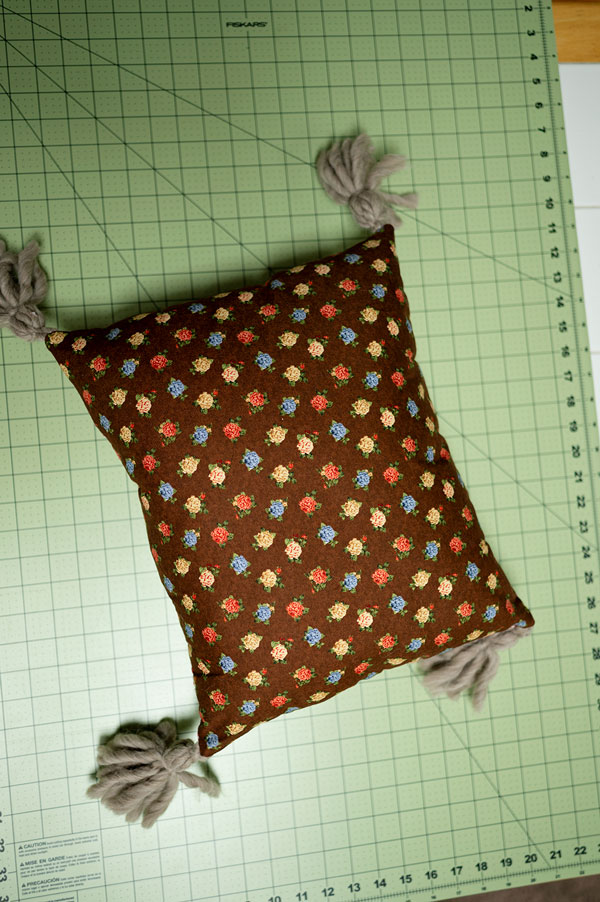
- The pillow project measures approximately 14″ x 17″ when finished, so it’s perfect to use those beautiful fat quarter bundles you’ve had in your stash for a while. The brown print was something from a random cut I had purchased, but I love it with the other fabrics that were part of a fat quarter bundle. I used the brown for the tree trunk, so I thought it worked well for my pillow backing.
- I recommend a medium weight interfacing for the back panel of the pillow. This is an optional step, but I think an interfaced fabric looks 100% nicer in a project than one without. It’s an extra step, but if you can do it, I suggest following through with that step.
- I use 2 strands of an embroidery floss to hand sew my openings on pillows closed. The pillow requires sewing through quilt batting, interfacing and two layers of quilting cotton. The sewing closed with regular thread is asking a lot, and I find it breaks as I pull my ladder stitch together into an invisible seam. While it’s extra stuff to purchase if you don’t already do embroidery or cross stitch, it’s so worth it for sewing small pillows and softies together after stuffing.
- The pillow with tassels are made using a roving wool yarn from Knit Picks. I love this yarn and have a few skeins of it in my yarn stash. You can omit tassels but they add so much to the finished project. One thing I will tell you honestly is that they are a bit of a pain to sew into the project, so it’s an extra bit of hassle factor getting them in there, but my recommendation is to go for it anyway. Once you’ve added tassels or any other trim to your pillow, you will want to add it to all your projects!
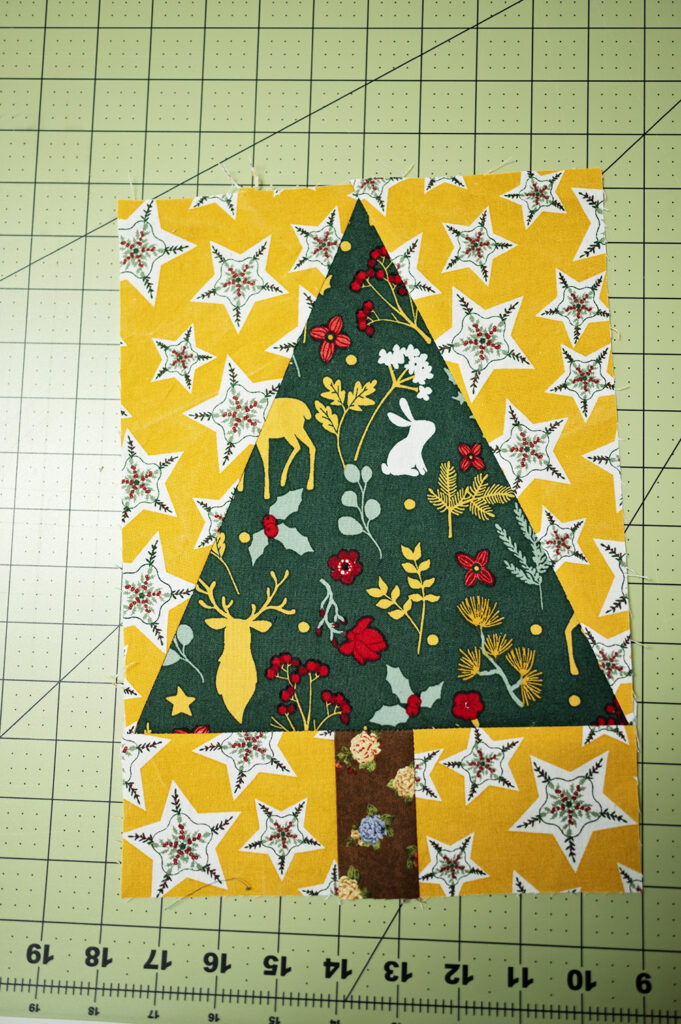
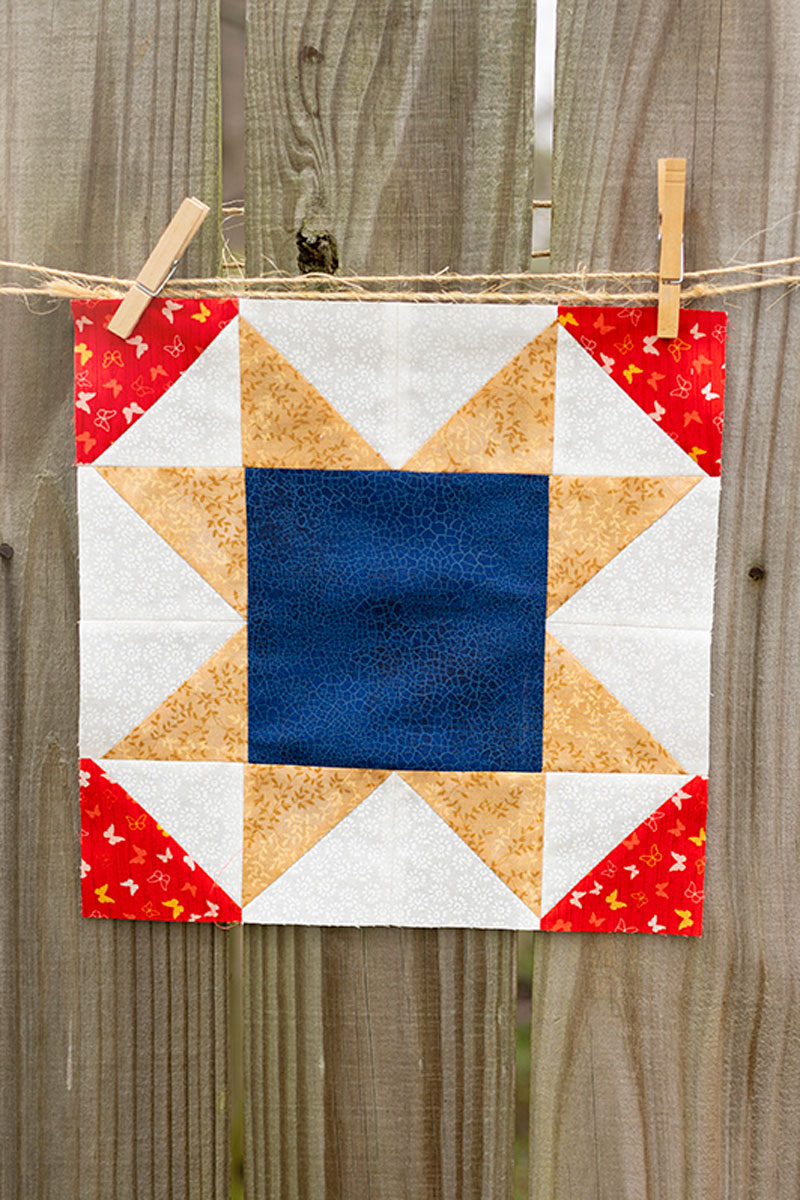
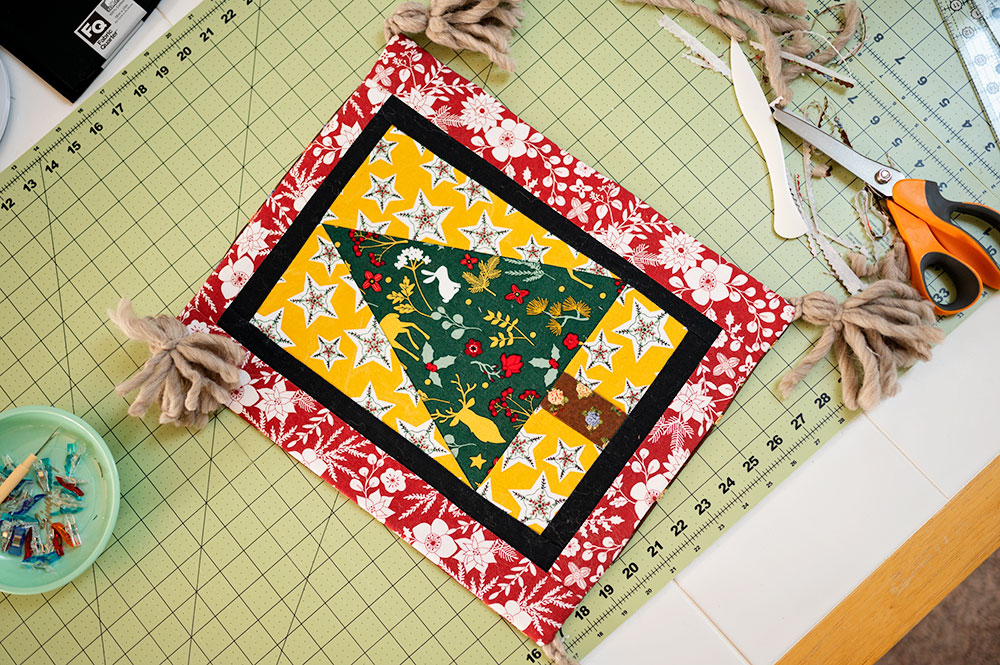
The star of today’s Quilt Pillow project is the Tree Block.
So your first step is to construct this block. Please visit my project post on constructing the tree block, and when you have this part made, we can move through the rest of the project.
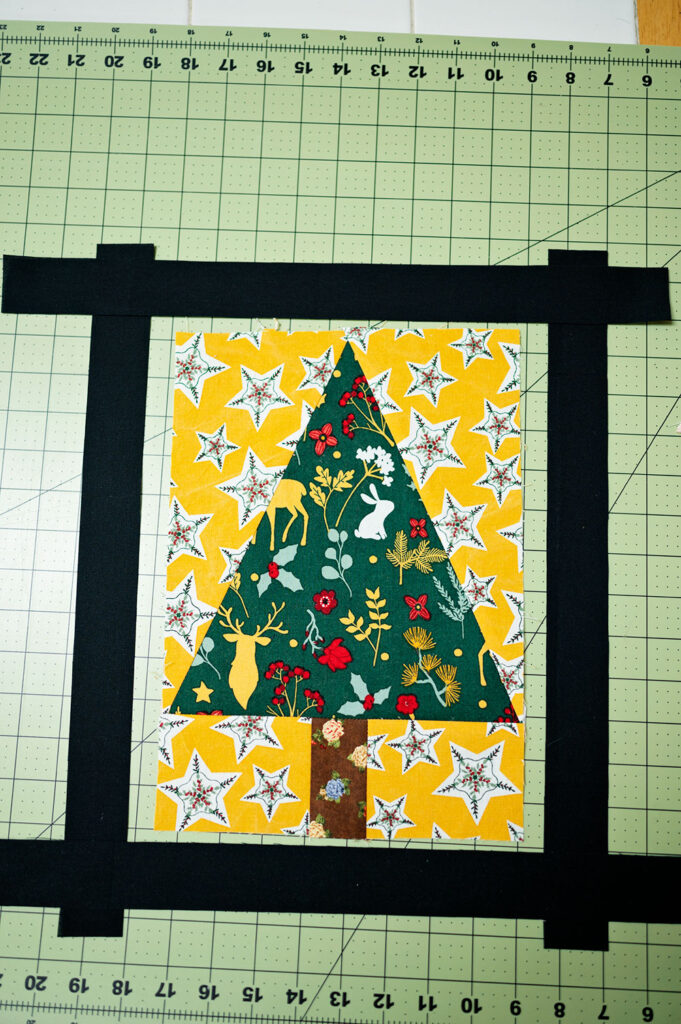
On width of fabric, cut two strips 1.5″ wide.
- First piece the top and bottom strips, or the north and south onto the block.
- Press both ends and trim the strips flush with the block.
- Piece the two long sides of the block, the east and west sides.
- Press both sides and trim strips flush with the block.
- By leaving the strips a little bit long and trimming down once attached to the block, it alleviates some of the exact measuring. No worries you might have cut a strip a little too short. This way, get the sashing onto the project and then trim to a perfect fit.
- I used black as my sashing. I thought it set off the block design beautifully and gave the eye a rest in between prints.
Sometimes cutting a little long and trimming back once the strip is in place is a way to satisfy the exactness of quilting while still feeling playful in making the project.
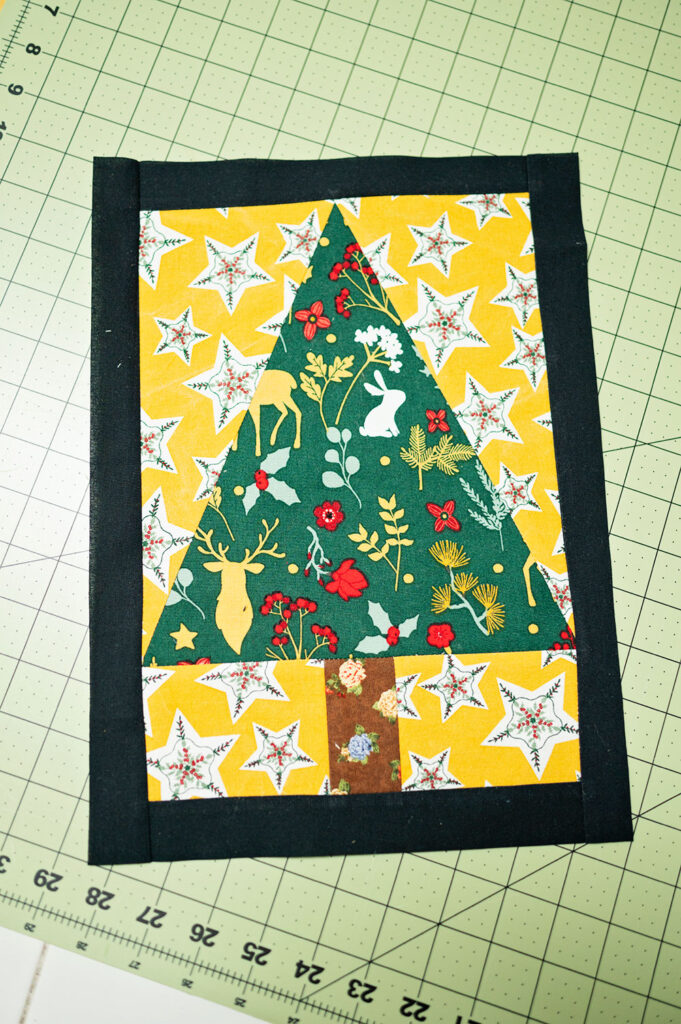
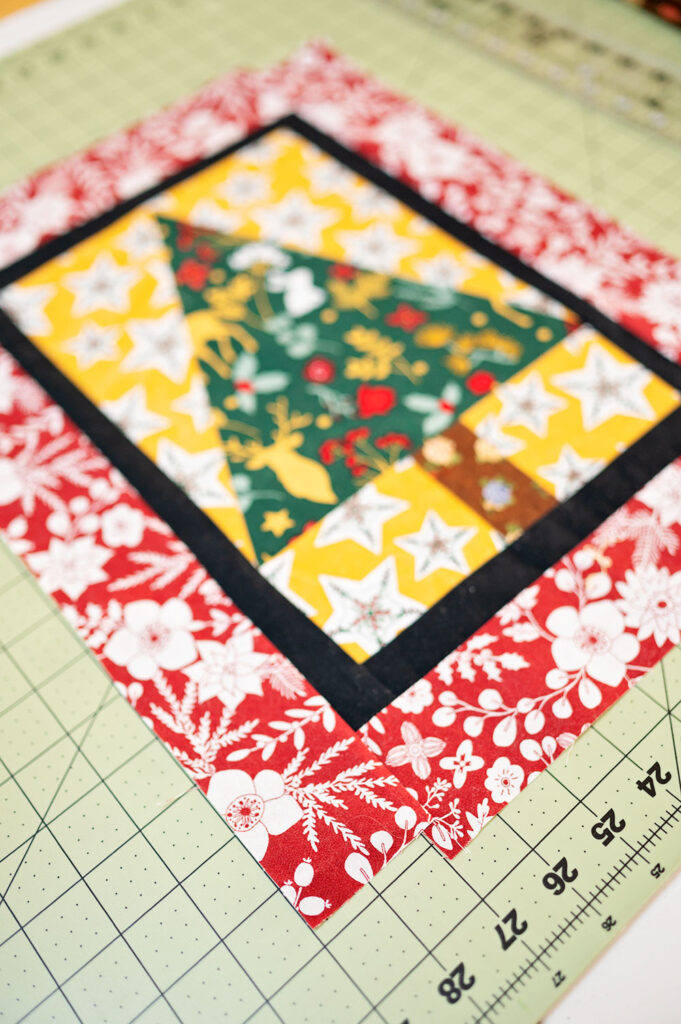
Now to add the outer border:
- Cut 3 2.5″ wide strips from the fat quarter you’ve selected for your border.
- As with the sashing, piece on the the top and bottom, press, and trim flush to the block.
- Piece the side border strips into place.
- Because we are using fat quarters in this project, you will likely find your side strips aren’t quite long enough. Don’t worry!! Sew them on and press open. Then trim the top and bottom strips flush with the side strips. In other words, square up your pillow.
The beauty of this project is that because it’s a pillow with one panel, the finished size isn’t critical.
We can trim a little here and there to get the block squared up. It’s no problem to take off a little here and there to get the outer edges flush. This it the beauty of a wide border and a pillow using one block!
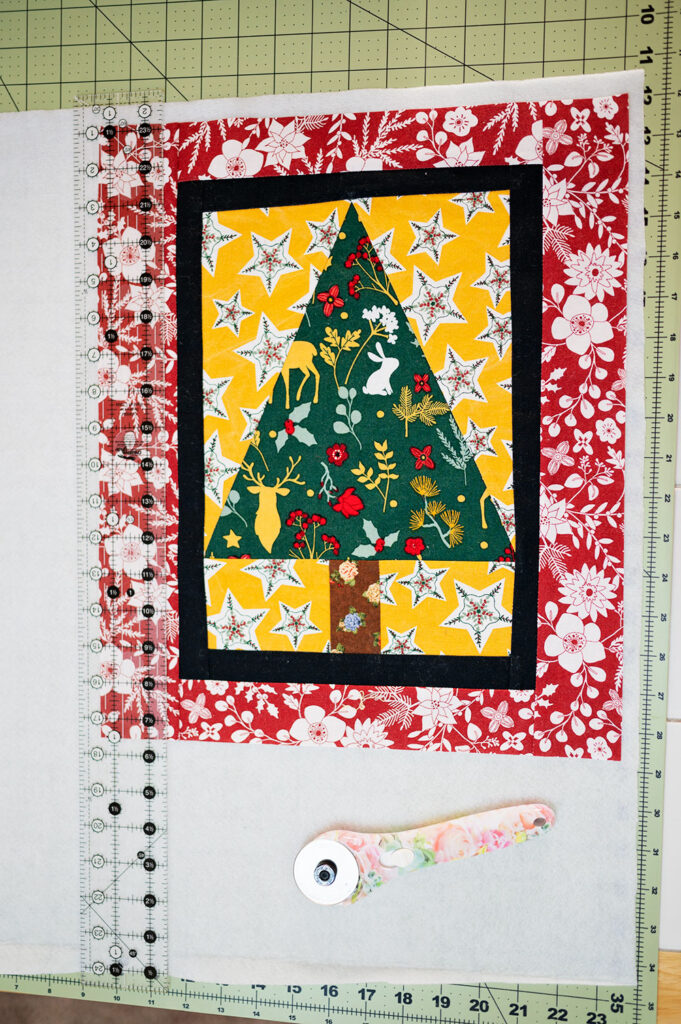
Time to get to the good part! The QUILTING!
- I used fusible quilt batting in this project, but you can use what you like.
- Lay the quilt block on the quilt batting of your choice.
- Leave an extra inch or so all the way around and cut the batting.
- I like laying the block on the batting and cutting around it so I don’t have to measure anything.
- Again, it’s nice to not have to measure something and just cut around.
- Adhere the fusible according to manufacturer’s instructions.
- Quilt as desired. I used stitch in the ditch.
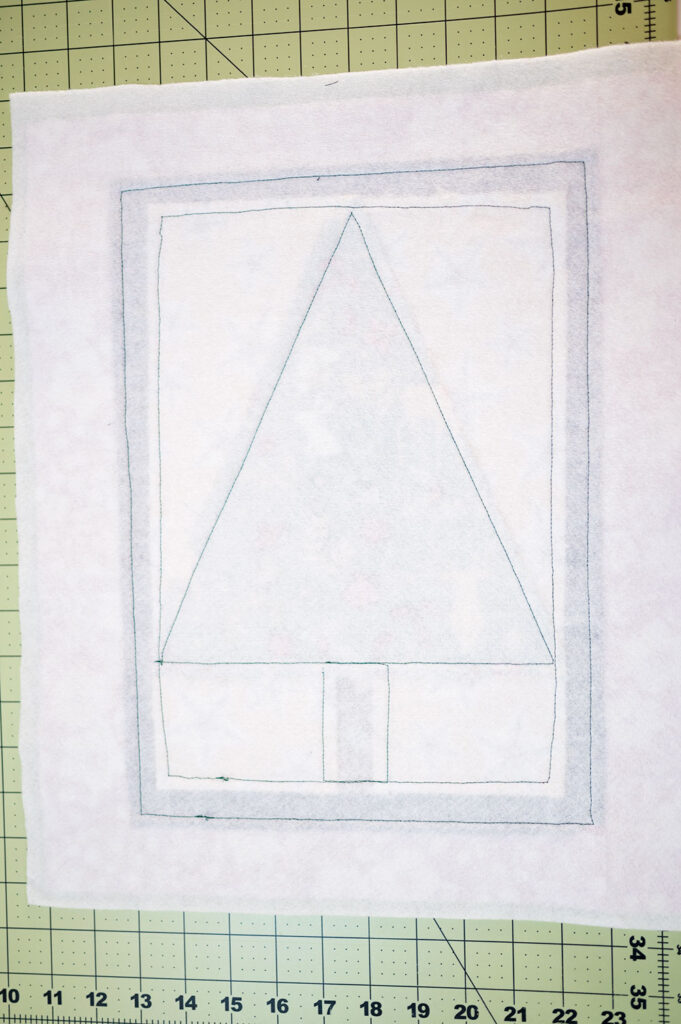
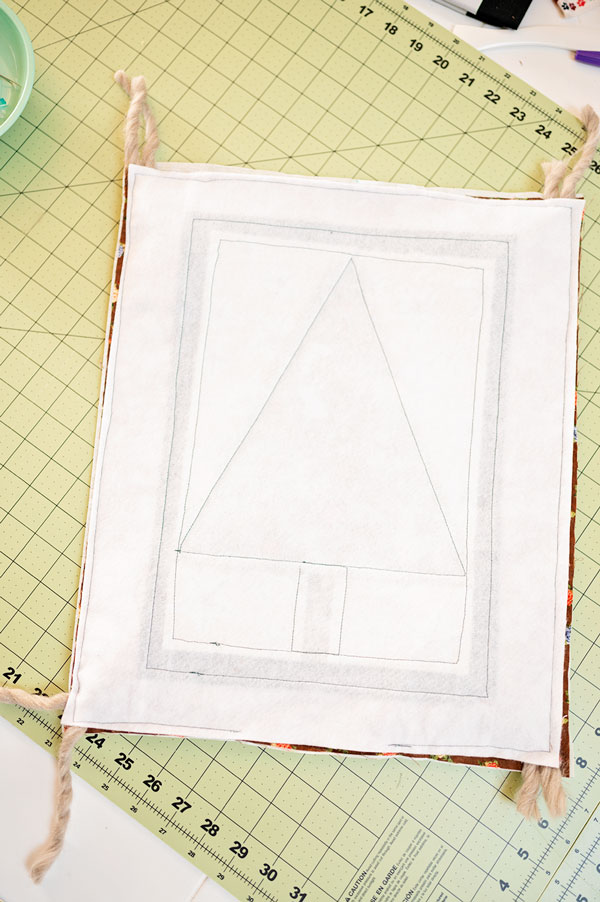
The Wrong Side of the work:
Here you can see the way I quilted the block. I followed the simple outlines of the tree and then both the inner and outer lines around the black sash.
I’m a minimalist when it comes to the actual quilting of my projects. I like that look and it’s easier for me to achieve on a small domestic sewing machine. It’s important to find your personal likes in your quilting and to understand what you can do with the equipment you have.
The home stretch!
- Adhere the interfacing to the back panel and prepare the tassels.
- Cut the back panel by laying the squared up, quilted front onto the fabric, or measure if you prefer.
- Angle the tassels inward and place front and back panels right sides facing.
Let’s talk about tassel placement:
- Remember you will have a 3/8″ seam allowance so be sure to give the tassel some leeway in the corners.
- You will want to catch the tails at the top as you sew the corner seam. Tails and not the tassel itself.
- Also, understand the tassel is kind of big and it’s a little bit awkward securing front and back panels and sewing around the bit hump the tassel creates in the corners.
- Take it slow and be sure the fabric edges meet as you sew the seam all the way around
When the pillow is sewn front to back it looks like this. To finish the insides, do this:
- Remember to leave an opening at the bottom big enough to get your hand inside to turn the work.
- Pink the inside seam allowance, if desired.
- Cut the yarn tails in the corners.
- Clip the corners to take out the weight.
- Examine the project carefully to be sure you caught all the fabric in the seam. It can shift a little with the tassels, so be certain you caught everything and don’t be disappointed finding a hole when you have turned the work and are in the process of opening the seams. Carefully inspect now.
Final inspection!
- Turn the work right side out.
- Use the point turner to carefully poke out the corners and to open the straight seams.
- Give the project a good steam press and carefully fold the seam allowance in at the opening of the project and steam press into place.
- Stuff your project with polyfil! I like an over stuffed pillow, but stuff it how you like it best.
The final touch
- Once the pillow is fully stuffed it’s time to close the project.
- While some people obsess about the stitches being invisible, I think there is something charming about that imperfect stitching. It’s the visual reminder that a real, live person put this project together.
- I recommend ladder stitch, but it takes practice. Overcast stitch works really well to close the opening
- I also recommend closing projects with 2 strands of embroidery floss and a large embroidery needle. I understand it’s an unusual instruction, but the floss does not break as easily as cotton thread and it’s easier to sew projects shut using this method.
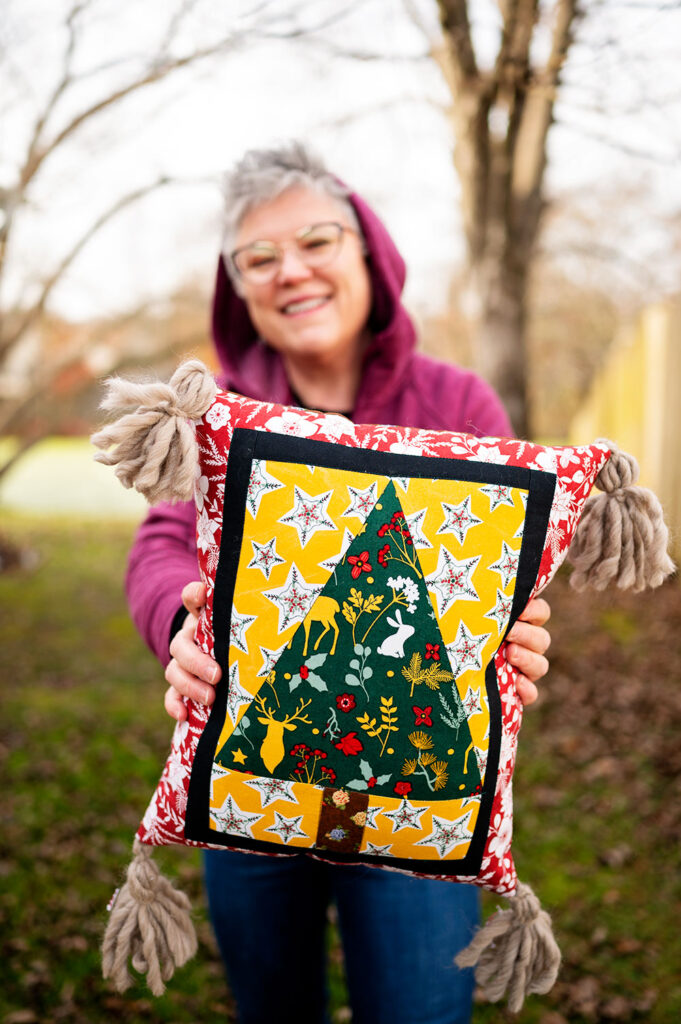
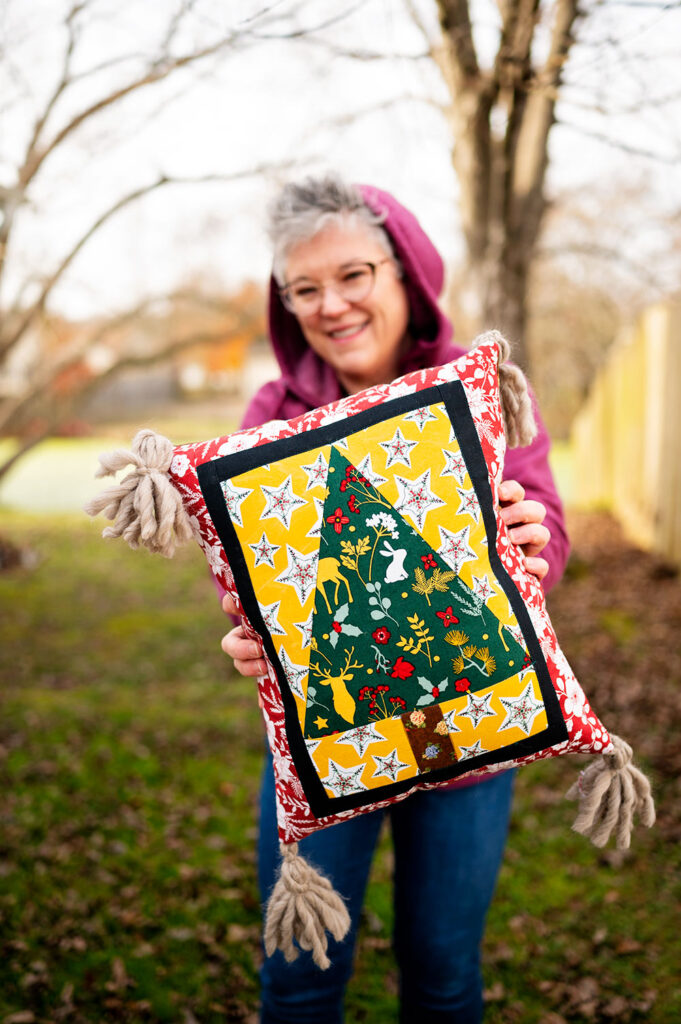
How does our final Quilted Christmas Pillow look?

The finished Front The finished Back

This is a really cute quilted pillow for Christmas, but what if I want one for all year long?
- Great question! The beauty of the method outlined in today’s tutorial is it will work for any quilt block you want to turn into a pillow!
- Use non specific holiday prints, and the tree pattern works all year long.
- Have fun with any large block design OR piece a few smaller blocks together to construct a custom pillow front.
Enjoy the method outlined in the tutorial and have some fun making all sorts of pillows! And be sure to stick around for plenty more fun ideas to come in the future.