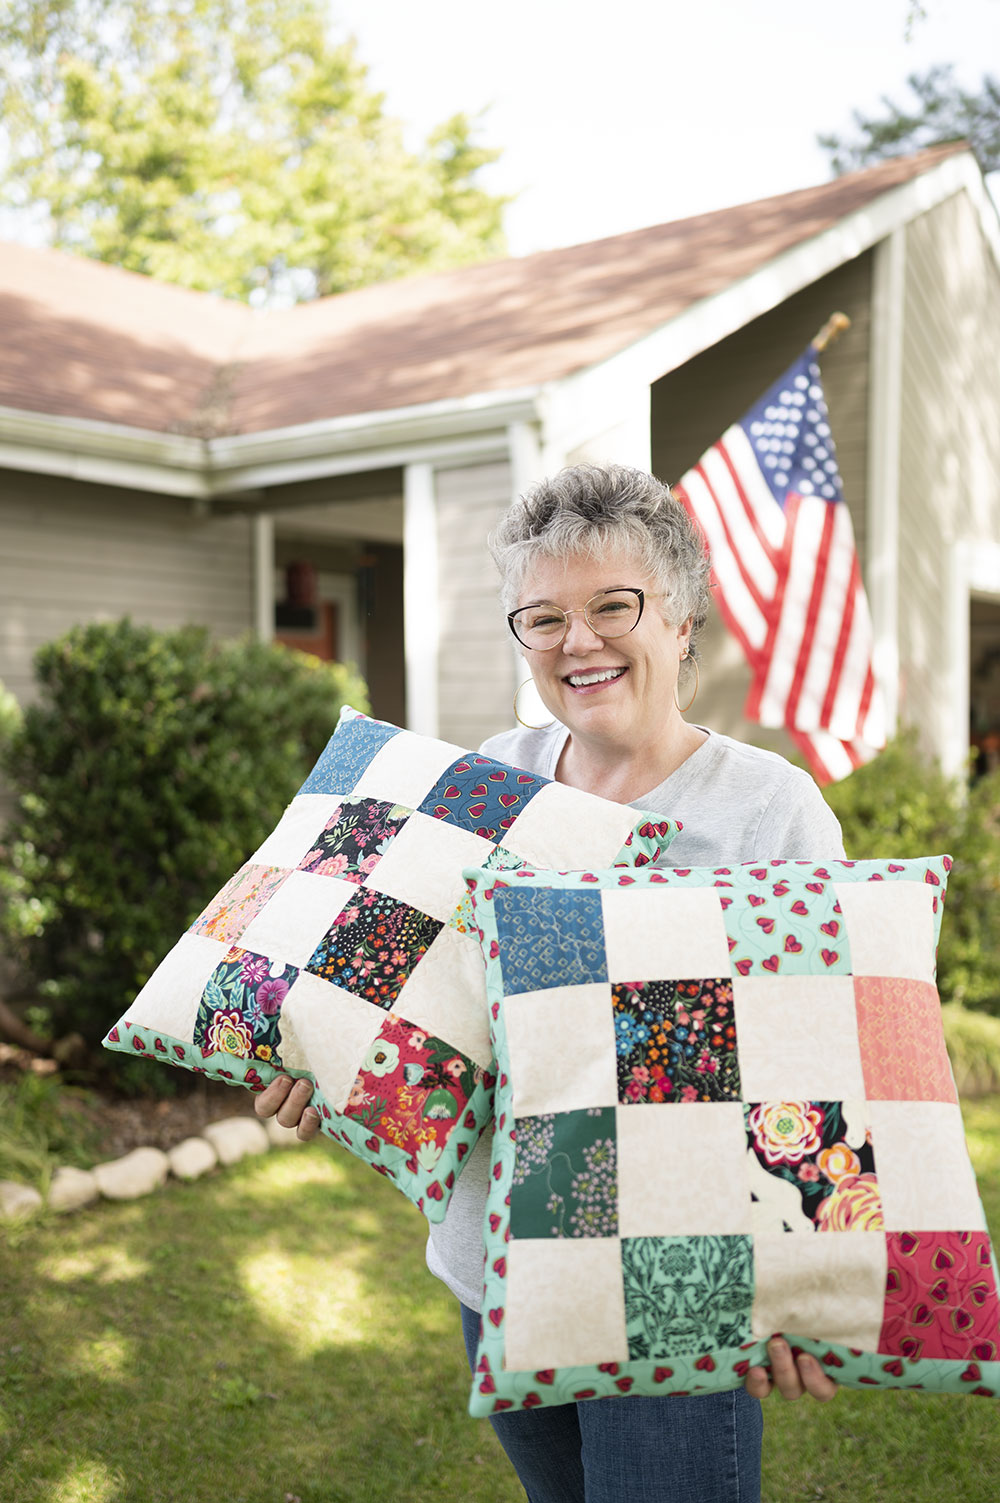
How to sew a Quilted Patchwork Cushion
Few things will update a space like a couple of new throw pillows. One simple update like adding new squishy pillows can completely change the feel of a room. Today let’s look at how to sew a quilted patchwork cushion (AKA a patchwork quilted pillow).
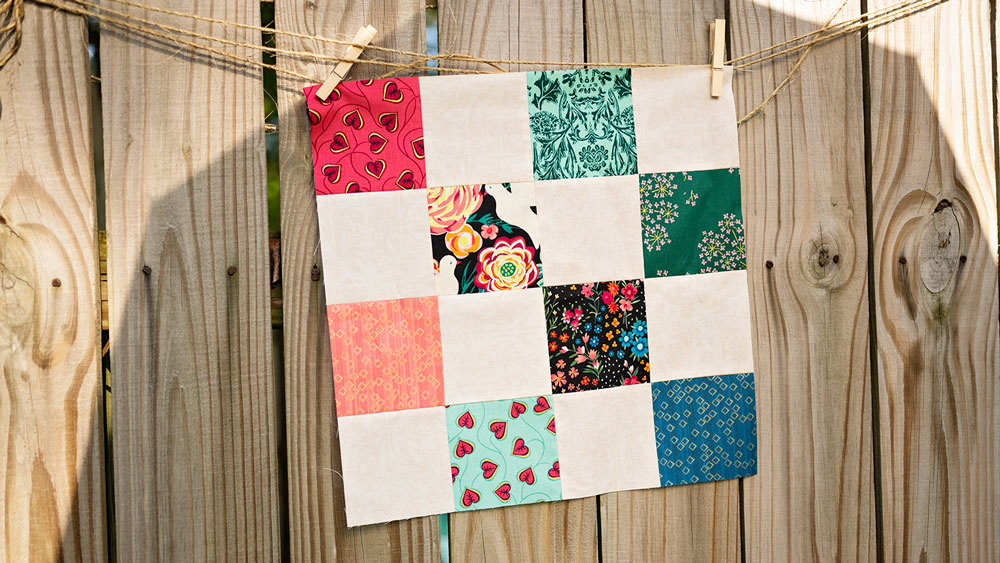
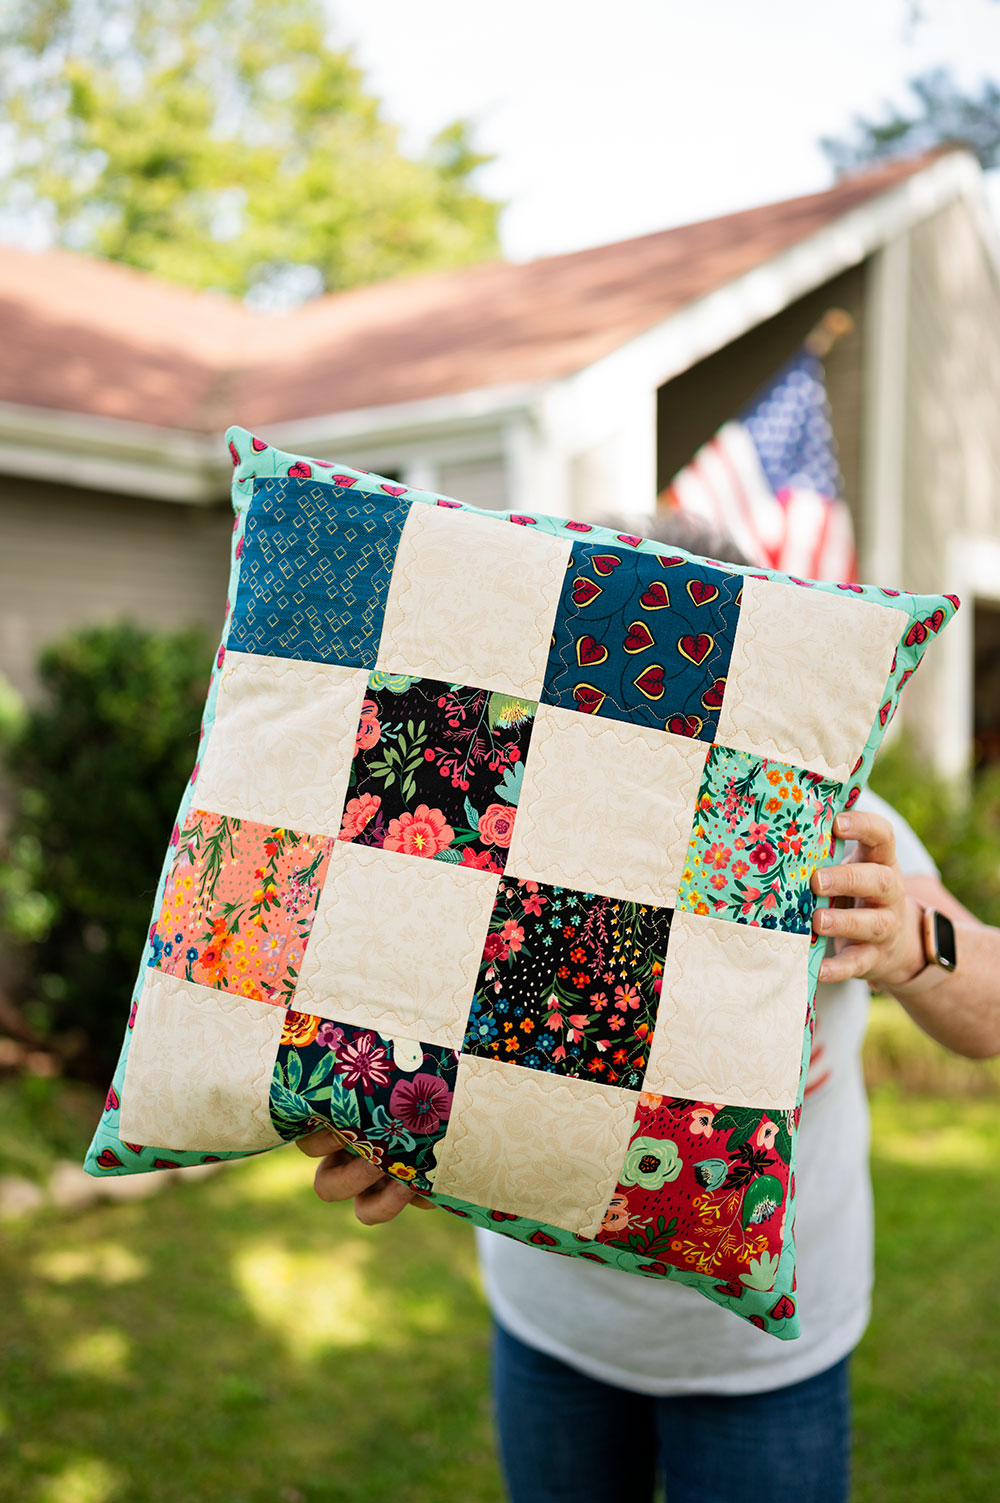
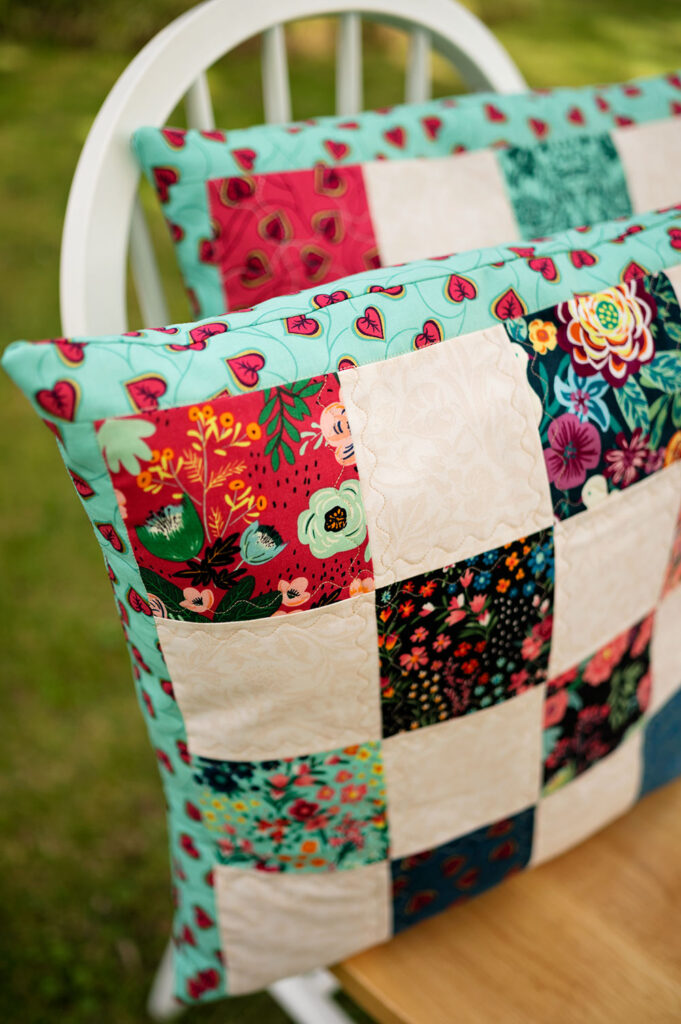
The absolute star of this project is the beautiful patchwork design that is created using 4 – Four Patch blocks sewn together into a mini quilt top. I have a wonderful tutorial on 4 Patch blocks if you are in need of a little extra information or a refresher. Let’s see exactly how to sew this quilted patchwork cushion!

As we learn how to make a quilted patchwork cushion, you will notice this is not a small project. It’s good sized and looks beautiful featured on either a bed or on your living room couch. While it is a substantially sized project, it’s still not like piecing and quilting a full sized quilt.
What I think is so amazing about this pillow project is that you can enjoy the most fun parts of quilting without having something that takes weeks to complete. And no difficult quilt binding to wrestle at the end.
How to construct the patchwork mini quilt top:
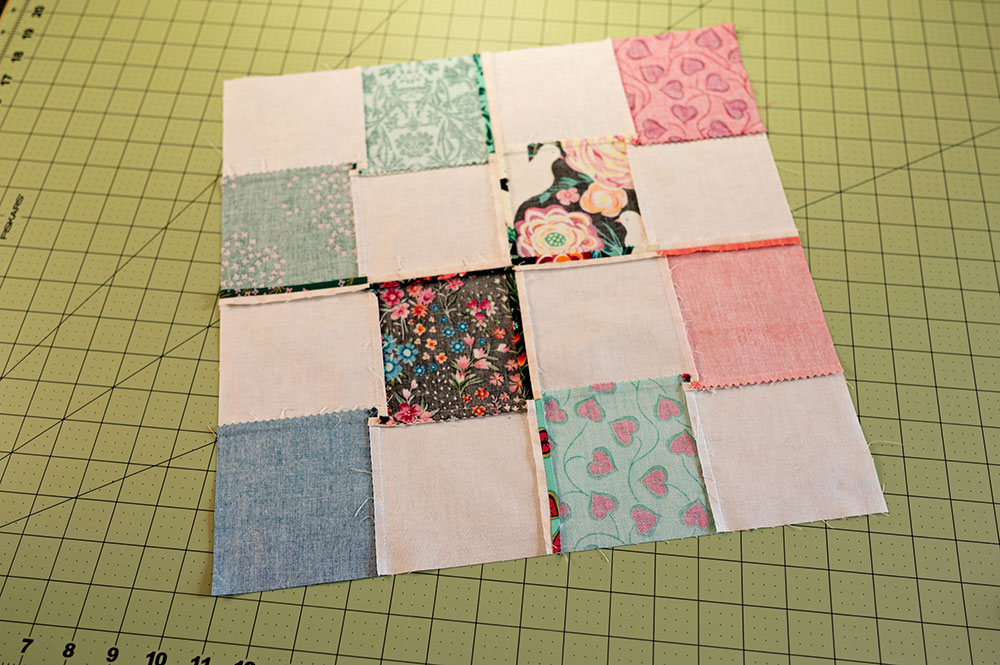
- Make 4 different 4 patch units. I used left over charm squares which are 5″ squares from my full sized quilt project.
- Trim each finished 4 patch down to 8.5″ square.
- Sew the four patches together into one unit.
- Trim finished unit to 16″ square.
Here’s the beautiful mini Quilt top before I added the border fabric and sewed it into an envelope pillow.
I case you don’t know, an envelope pillow is a pillow with two pieces of fabric sewn to overlap the opening on the back side of the finished cushion. You will use a pillow form as the pillow stuffing part, and the form can easily be inserted and removed. This allows for changing the cushion cover any time you like. Or easily washing the pillow cover as necessary.
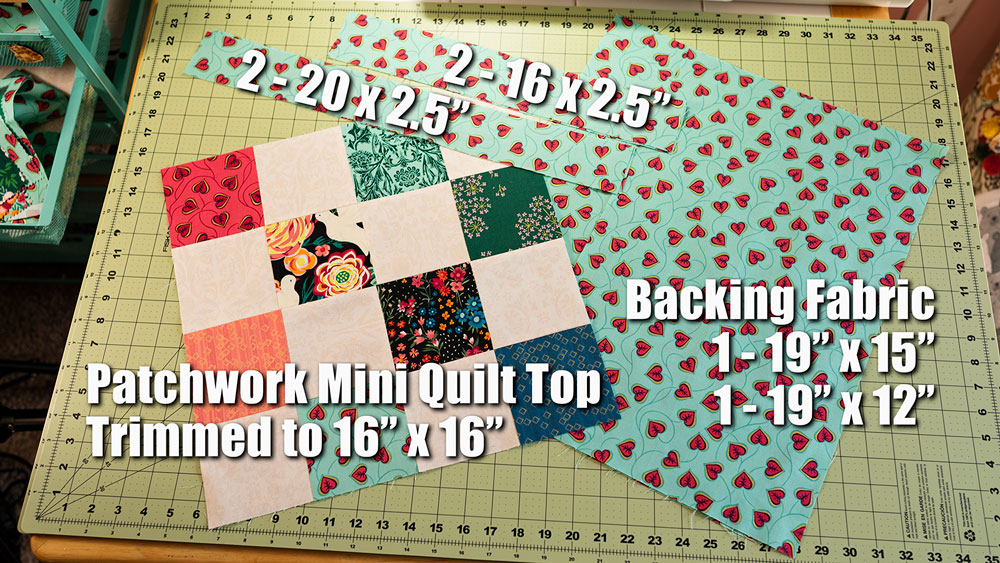
Here is the Material list for the Quilted Patchwork Cushion Project.
- The finished Mini quilt top in a finished size of 16 x 16 inches. You could use a panel print if you like or a solid cut of fabric if the patchwork quilt feels like too much.
- 2 strips cut 20 x 2.5 inches. These are the top and bottom borders.
- 2 strips cut 16 x 2.5 inches. These are the side borders.
- 1 piece of backing fabric cut 19 x 15 inches.
- 1 piece of backing fabric cut 19 x 12 inches.
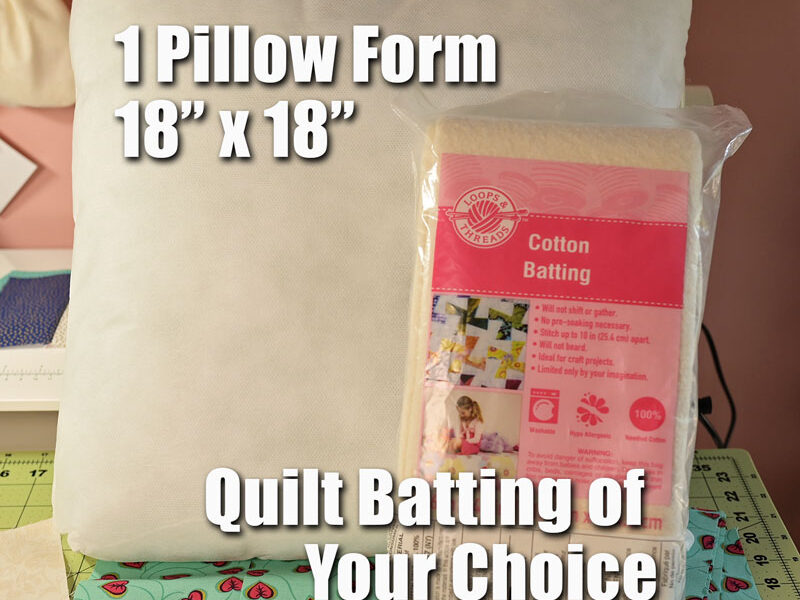
- Quilt batting cut 19 x 19 inches. I used fusible quilt batting which I prefer for small projects.
- Cotton thread.
- 18 x 18 inch pillow form.
Tools for making the Quilted Patchwork Pillow
- 6 x 24 inch quilting ruler
- Rotary cutter
- Pinking shears or fabric scissors
- Cutting Mat
- All purpose Presser Foot for hemming the envelope fabrics
- 1/4″ Presser Foot for piecing
- Walking foot for quilting the pillow top
- Sewing Machine
- Steam Iron
- Ironing board
- Seam Gauge
- Spray Starch

Instructions for constructing the Patchwork Pillow:
- Construct the 16 x 16 inch patchwork mini quilt top as described above.
- Sew hems on the backing fabric so there is finished edge on the fabrics where the pillow form is slipped in and out of the cover. Do this by using the seam gauge to measure a 1″ hem on the side of the fabric that measures 19″. Press into place. Press the raw edge under, meeting the press line and steam into place. This encloses the raw edge of fabric. Top stitch into place. I used a straight stitch set at 3.5mm.
- Using a 1/4″ seam allowance, attach the border strips to the patchwork piece. Begin with the sides, or the east/ west of the quilt top. The sides are the fabric cut 16″ by 2.5″. When both sides are on, press seams open.
- Using a 1/4″ seam allowance, attach the remaining strips to the top and bottom of the patchwork front. This is the north/south of the quilt top. Once attached, press seams open
- Apply quilt batting according to manufacturer’s instructions.
- Quilt the mini quilt top as desired using the walking foot.
- Square up sides of quilted mini quilt top. Trim to 19″ square.
- On a flat surface, lay patchwork front right side up. Lining up the raw edge along the top of the patchwork front, and turning fabric right side down, place the larger hemmed back piece into place.
- Matching raw edges along the bottom edge of the patchwork front, and placing fabric right side down, place the smaller hemmed back piece into place.
- Pin generously to hold pieces together.
- Using a 1/2″ seam allowance, sew all the way around the edge of the pillow. Use a 2.5mm stitch length and sew where the back panels meet two or three times to reinforce. I used a walking foot to sew these together as the project was quite thick and I thought it gave more even sewing.
- When finished sewing, trim all the way around the pillow with the pinking shears. This ensures the fabrics do not fray over time. Be sure to carefully clip the corners so they turn out well.
- Turn pillow out and give it another good steam press.
- Insert the pillow form or cushion. You can use a little poly fil in the corners to fill them out if desired. This is optional, but I did it in mine and the corners are perfect.
- Enjoy!
Some tips and Tricks for putting the Patchwork Quilted Pillow together:
When piecing the 4 patches together, it’s best to first sew two finished blocks together to form rows and then sew the rows together.

The best quilt tops are very, very flat. The flatter the quilt top, the nicer it looks when quilted to the batting. Using spray starch with careful piecing and pressing is critical for success in creating a flat quilt top. It’s also important to have a good strategy for pressing seams. Also, being sure to snip away thread tails is very important to have the nicest looking finished quilt top.
Piecing the patchwork panel takes the longest time in this project, but is still something that could be completed in a few hours. Make your mini quilt top one afternoon and finish the pillow the next day. If you are ambitious, you could piece the quilt top in the morning and finish the pillow after lunch.
A patchwork pillow is a fun way to use up smaller fabric scraps in your stash or a way to play with a pretty charm pack that caught your eye. When I purchase a charm pack, I always buy a yard or two of something that will work well as a neutral to balance the colorful prints and another coordinating yard or two of a colorful print in the same line to use for backing or sashing or binding. If you buy those things together, then the charm packs always have great looking coordinating fabrics for when the right project comes along.
If you are like me, having visual instructions is often times a lot more helpful than written instructions alone, so please enjoy this video on how to put together your own quilted patchwork cushion.
You might also like:

Hi! I’m Pattymac
Sewist, baker, maker
I’m a creative lifestyle blogger living and working in Coastal Virginia. When I’m not mixing or stitching or taking pictures, I’m out exploring the cook book section of my favorite library or munching my own home baked cookies at a mid week movie matinee.