Small Live Christmas Tree
If your home is more cottage than Biltmore Estate, decorating a small live Christmas Tree is a great way to find some holiday cheer without over whelming your space.
Trends come and go faster than a dollar bill these days. And what’s popular one year, may not be so hot the next year. This is why I like to focus on projects with some longevity. Decorating a small live Christmas Tree is on the more whimsical side, but it’s easy to personalize this tree for your own taste and decor. Be sure to read to the end, because I will give you the steps to decorating this darling little living Christmas tree.
And when a tiny tree is this cute, who would mind?

The project did not start out looking like this, and it took a few steps to achieve get here. But for us creative types, the reward is definitely worth the little bit of extra effort.
Using a live plant, it continues to grow over the years, so I thought that fit well for those of us who love gardening.
If you feel left out by the term “gardening” because you picture vast landscapes tended over by the Queen, let me remind you that having a house plant or two also counts. We call this Indoor Gardening, and really it’s my favorite. I started out living in apartments and condos and the like, so I guess that is why house plants are my first love. And why this wee little Norfolk Island Pine so appealed to me.
How did my small live Christmas Tree look when I started?


I purchased a Norfolk Island Pine at a local plant nursery. It’s locally owned, and has a selection of super healthy plants. Since I intend to keep this as a house plant, I wanted to start with a nice healthy plant. I purchased a terra cotta pot about the same size as the plastic pot, and decided paint it.
First off, let me share a little about what this plant is and what it is not.
Norfolk Island Pine is actually a tropical plant, and not a tree at all. So like my other tropicals, it likes bright light and is not cold hardy. I live in Zone 8A, so that means my winters are too cold for this little gal. She’s going to stay inside with me all winter, but I will place her outside in late spring with all my other tropicals. This plant needs to be kept away from drafts and she will need me to mist her to keep humidity levels up. So while we are calling this project a small live Christmas tree, it’s actually a house plant.
To paint the pot, it’s a matter of spray painting it from all sides, and doing it as evenly as possible. I started with mine upside down, and was not happy with the way the rim of the pot looked when I turned it over. I simply sanded it out with a 180 grit sanding block until it felt smooth to me, and then spray painted the next layer of paint over the newly sanded parts. It worked like a charm. Spray paints come in a ton of colors now, but this is a Christmas project so I wanted red. I actually had this on hand from a furniture project, so I didn’t have to buy anything.
The painting part is not glamorous, but I’ll share a picture of the process anyway.
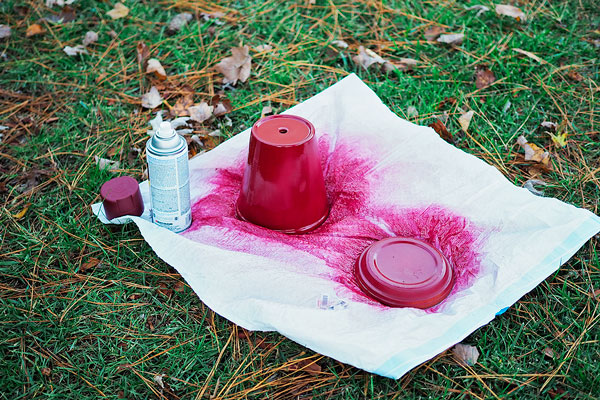
I manage paint projects on opened trash bags. It keeps the project clean, and paint doesn’t go every where. This is definitely an outside project. It took a couple of coats of spray paint upside down. It dried over night, and I sanded the rough bits the next day. Then I painted a couple more coats. It dried again overnight, and voila. I had a beautiful custom color painted pot for my Norfolk Island Pine.
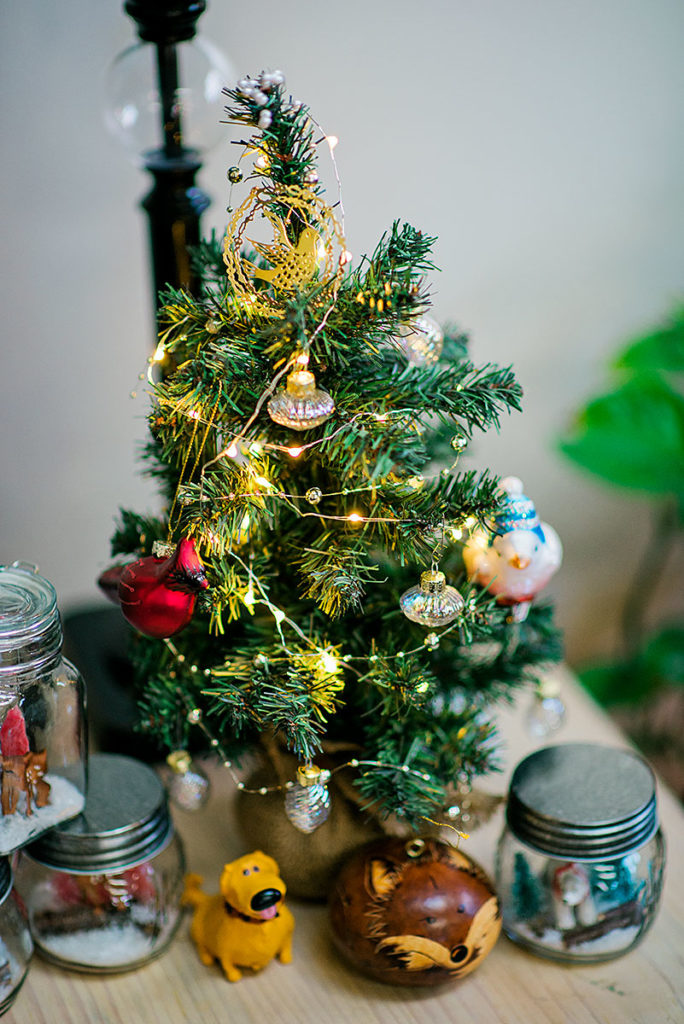
Here it is in the finished planter.

Beautiful, right? I put white stones over the soil as a top dressing and set up my plant on a base of pea gravel borrowed from my backyard kitchen garden. I liked the white top dressing, because red and white are such pretty holiday colors. This is how the plant will be kept for the majority of the year. But since it’s Christmas, and I wanted to make this into a Christmas tree I added a little to it.
Using a Christmas color of paint and accenting gravel or stones will liven up a small living Christmas tree.

As Stevie Wonder would say, “Isn’t she lovely?”
The tree is decorated with budget friendly items. I bought the star shaped Fairy Lights at my Lidl for $2 and the ornaments were on sale for about the same price. I love these battery operated LED lights and own about a dozen different strands. I got lucky on the inexpensive ones and grabbed 4 or 5 boxes when I saw them. The ornaments were so cute and I knew I wanted to do this as a red and white themed project, so I picked them up when I found them. I got them at the same time I bought the supplies for my Vintage Snow Globe DIY project. You should check that one out, too, if you haven’t seen it already.
As a final touch, and this is completely optional, I made some small bow ornaments. I wanted to try this out, and I think they are darling. I think the handmade bows give the perfect finishing touch, and aren’t they super cute? There was a glue gun involved in the making of the bow project, and they would also be prefect on a barrette for a little girl. Many possibilities for that part of this project.

When all is said and done, this is a beautiful and very expensive looking project that cost me about $25 and a couple of hours to make. It’s perfect for your own home, and it’s a very nice gift for someone really special. With battery operated lights, this project could visit nicely with someone in an assisted living facility or in a hospital room. I know that sounds a little depressing, but let’s be honest. There are are people in those situations during the holiday season, and this cheery little tree could be a bright spot for someone in an otherwise sad situation. By the same token, it’s a lovely gift to take to your family member hosting this year’s dinner or for a special friend or neighbor. I will add that a small artificial tree is also adorable and maybe even a better choice.
Here’s what you need to decorate a small living Christmas tree:
- Small Norfolk Island Pine
- Terra Cotta pot and dish about the same size as the plastic pot
- Spray Paint
- 180 Fine Grit Sanding block
- Potting soil
- Decorative stones to top dress soil and create a base in the dish
- One package mini ornaments
- One strand of Fairy Lights
- Ribbon and Twine to make the bows
- Glue Gun (only if you make the bows)
- Glitter…which is optional. My tree came with glitter already sprinkled on, but I added a little more.
I know it seems like a long list, but really it comes together so quickly once the pot and dish are painted. Here are the steps to make this project:
- Spray paint the pot and dish. You will want to paint the pot and dish upside down first, let dry, turn over, sand the rough bits smooth, and paint the rest of the project. Allow to dry overnight.
- Repot the plant into the freshly painted and dried pot.
- Apply decorative stones for top dressing.
- Put the Fairy Lights on the Tree.
- Hang the mini ornaments.
- Make and hang the bows. (totally optional)

I hope you enjoy this mini Christmas Tree project that incorporates both gardening and DIY. Once the season is over, the decorations can go into a ziplock bag, and be put away in a small space in a hall closet. I love the lights so much, they generally stay on through the whole winter.
If this is your first time visiting my blog, welcome! Please sign up for my email list while you’re here. I design lots of fun content, and I will email you about once a week with links to all the fun projects and videos. And if you are a regular reader, thank you!
You Might Also Like:
- DIY Vintage Inspired Snow Globes
- Felt Christmas Crafts
- Sew your own Christmas Tree Napkins
- Christmas Cupcakes


Hi there, I’m Patty.
Sewist, baker, maker
I love figuring out new ways to use pom poms, where I can stash more fabric, and I’m always wondering what to bake next…chocolate or lemon? When not dreaming up new things to make (or bake), I love riding my beach cruiser on the Boardwalk, escaping to mid week movie matinees, and planting new things in my tiny but mighty container garden.