White Chocolate Dipped Oreos
Looking for a super fancy treat to serve while still holding onto your budget? Wow your guests (or your family) with beautiful, professional looking cookies following a couple of simple steps. White Chocolate Dipped Oreos are both easy to make and delicious to eat.
And besides, who doesn’t love an Oreo cookie? Stepping up your game and serving them as white chocolate dipped Oreos is completely next level. IMHO.

Here’s the thing. It seems most people only make and serve chocolate dipped Oreo cookies for Christmas. The question is WHY? It’s such a pretty dessert, and while simple to make, they honestly look extremely fancy.
A platter of white chocolate dipped Oreos could be served in lieu of a birthday cake, or at a bridal shower, or an anniversary party.
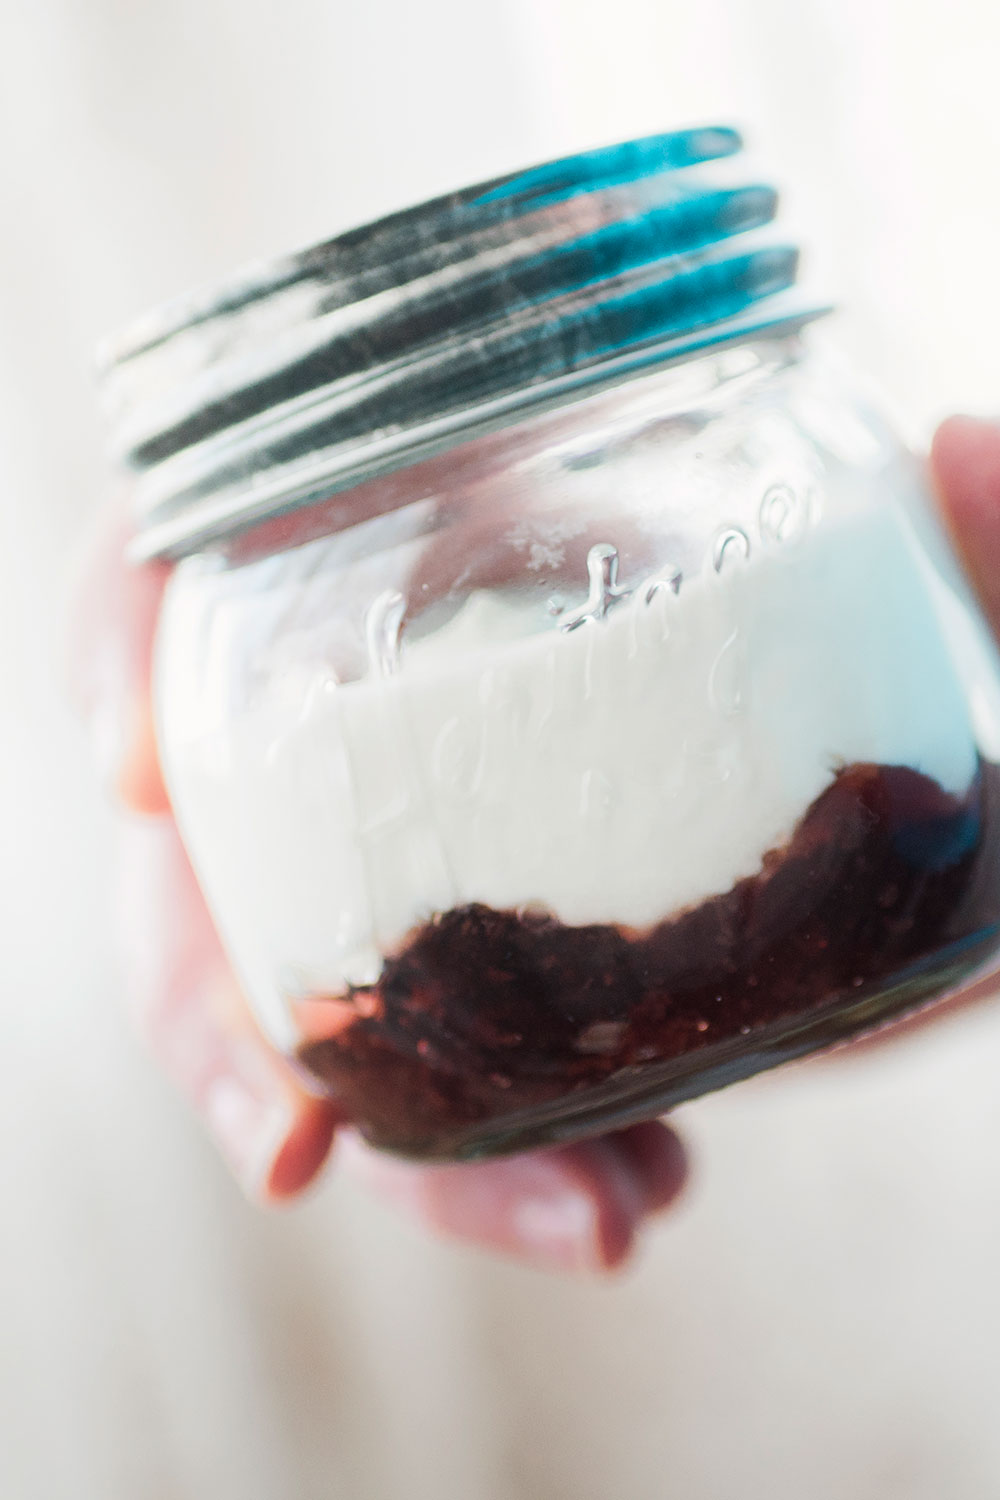
While we all love cake, let’s have an honest conversation. Our food system is having some serious issues right now. And many of us are planning ahead. Some of us are planning WAY ahead and stocking pantries with longer term food storage items. If you properly pack Oreos in sealed buckets, the freshness will last longer. So in a year or 18 months when you need a special treat for someone’s birthday, if you plan ahead (a little) right now, you can go into your pantry items and pull out the ingredients to make something special for someone later.
There’s nothing wrong with putting a few boxes of Oreos and some chocolate into your food storage pantry. Understand you need to use these items by the second or third year anniversary of putting them away, but I don’t feel like that’s such a terrible thing.
It’s a great medium range preparation item, and if times are hard later on, having the unexpected treat of a beautiful cookie as a surprise will be a major mood elevator in a time when people will probably need it most.
Let’s be real. Nobody gets a huge smile over a stalk of celery or a plate of kale. Well, some people might, but I don’t know anyone like that.
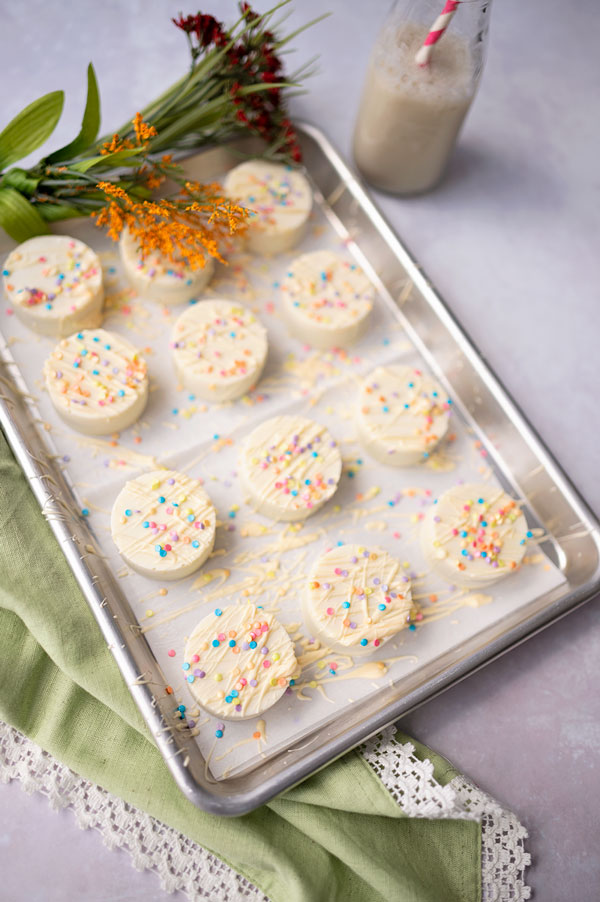
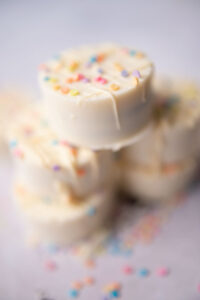
White Chocolate dipped Oreos are pretty enough they can be served in the pan you used to decorate them.
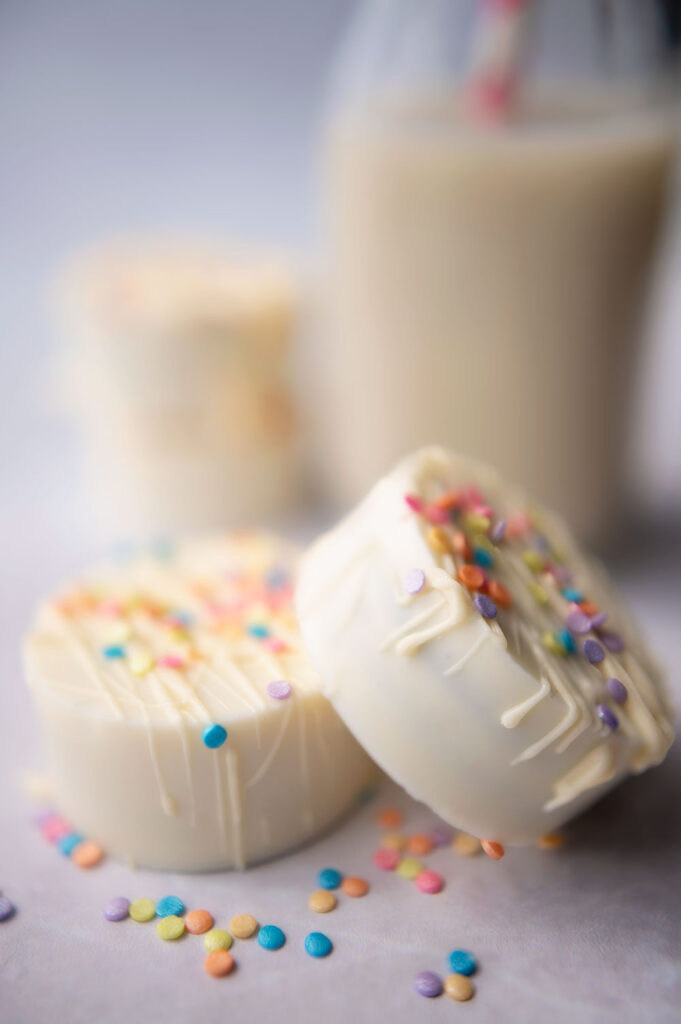
For something a little less formal, sharing your cookies with the pretty over spray drizzles and sprinkles in tact is a fun way to share your surprise treat.
Tips for working with white chocolate:
Is there a white chocolate Oreo?
The Nabisco brand releases an official version of white chocolate dipped oreos every year around Christmas. Home bakers tend to make their own version around that time as well. By why limit yourself to only having some this fabulous once a year?
How many days in advance can I make chocolate covered oreos?
White Chocolate dipped Oreos are perfect to make ahead for celebrations because they can be stored for up to 2-3 weeks. Make sure they are stored in an airtight container like my personal favorite, the Lock n Lock system. (affiliate link)
Can you use white chocolate chips for dipping?
While many people do melt chocolate chips for all sorts of recipes, it’s really not the best method. This is because chips are specially treated to hold their shape to look good after being baked into cookies. You will have better results using chocolate designed to be melted. My favorite are the chocolate melts from Ghirardelli, and I use them in anything where I’m using melted chocolates. (affiliate link.)
Why did my white chocolate chips not melt?
Well, as we discussed in the last section, you are already pushing a boulder uphill trying to get a good, smooth melt from chocolate chips. White chocolate is also VERY picky to work with and if you over heat the chocolate or try to do too much at once…..like using a microwave on high, then your chocolate will seize. This means it turns into a horrid, grainy blob of a mess. Also, if you get any water into the chocolate it can have the same effect. So over heating too fast and causing steam could bring water vapor that will drip into the chocolate and ruin it. You must be slow and steady to melt your white chocolate.
How do you thin white chocolate for dipping?
I recommend adding a little grapeseed oil to chocolate during the melting process for either dipping or drizzle. Grapeseed oil is flavorless, so it won’t change the taste of your food which is also important in cakes. And it’s without color so it won’t discolor your beautiful chocolate. Start with a splash and stir, stir, stir. Only add enough to obtain the consistency you’re after. If you go too runny, add more chocolate to thicken the mixture.
How do you make white chocolate smooth?
As we just discussed, use an unflavored oil, like Grapeseed oil, (affiliate link) to gently thin your chocolate.
Why is my chocolate not hardening?
The short answer is your room is too warm. Chocolate needs to be in a cool environment to resolidify so if your room is warmer than 68 degrees F, your chocolate will be soft. You can put it in the fridge, but that can cause bloom which means the chocolate will develop a cloudy look. It’s safe to eat, but it’s not as pretty.
Ok, now that we understand working with white chocolate, let’s talk about how to make today’s delicious recipe.

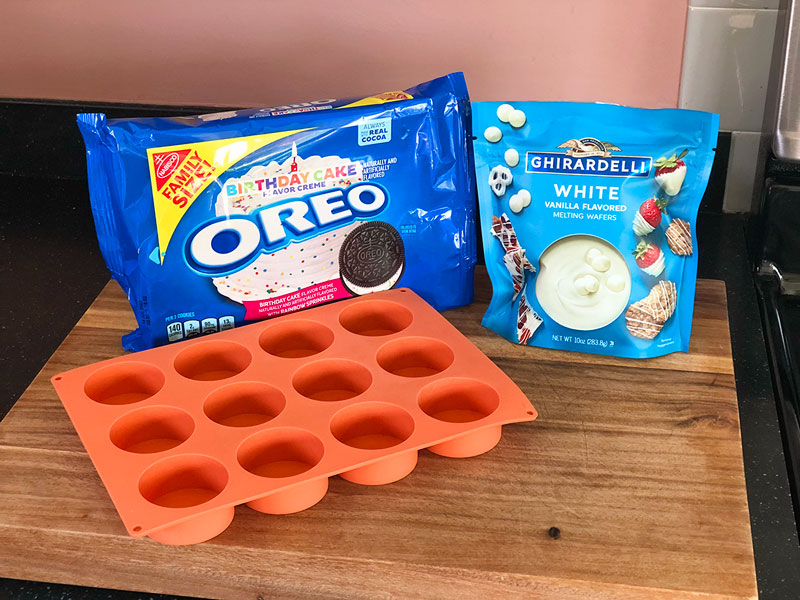
Ingredients to make White Chocolate Dipped Oreos:
- Your favorite Oreo cookie. (affiliate link) My personal favorite is called Birthday Cake.
- White chocolate. I recommend Ghirardelli melts for best success.
- Pretty sprinkles (affiliate link).
- Grapeseed oil or your favorite vegetable oil.
Special equipment needed to make White Chocolate Dipped Oreos:
- Specially designed candy mold (affiliate link) to make gorgeous, square edge dipped cookies (affiliate link).
- Small offset spatula (affiliate link).
- Chocolate Melting Pot (affiliate link).
- Parchment Paper
- Heavy duty flat tray (affiliate link).
- Fork
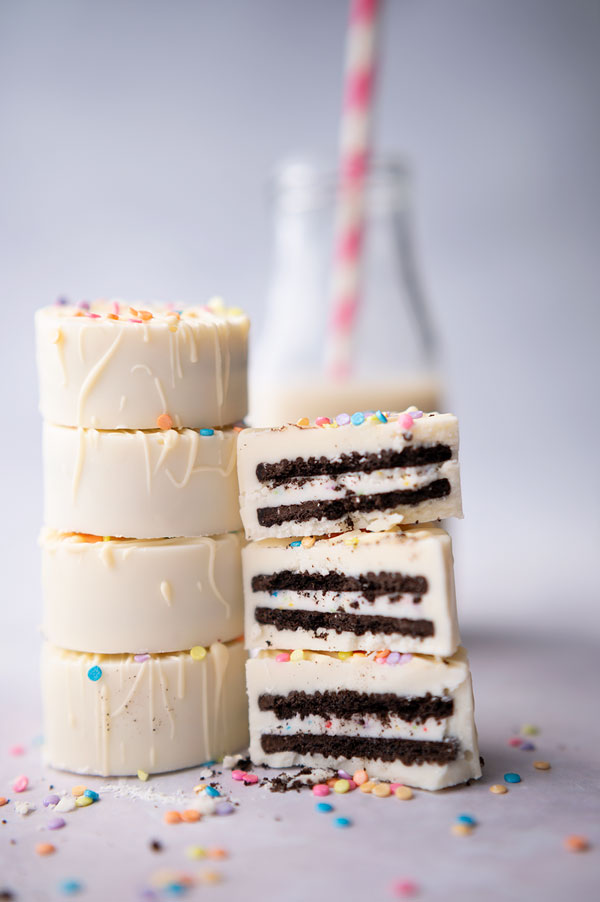
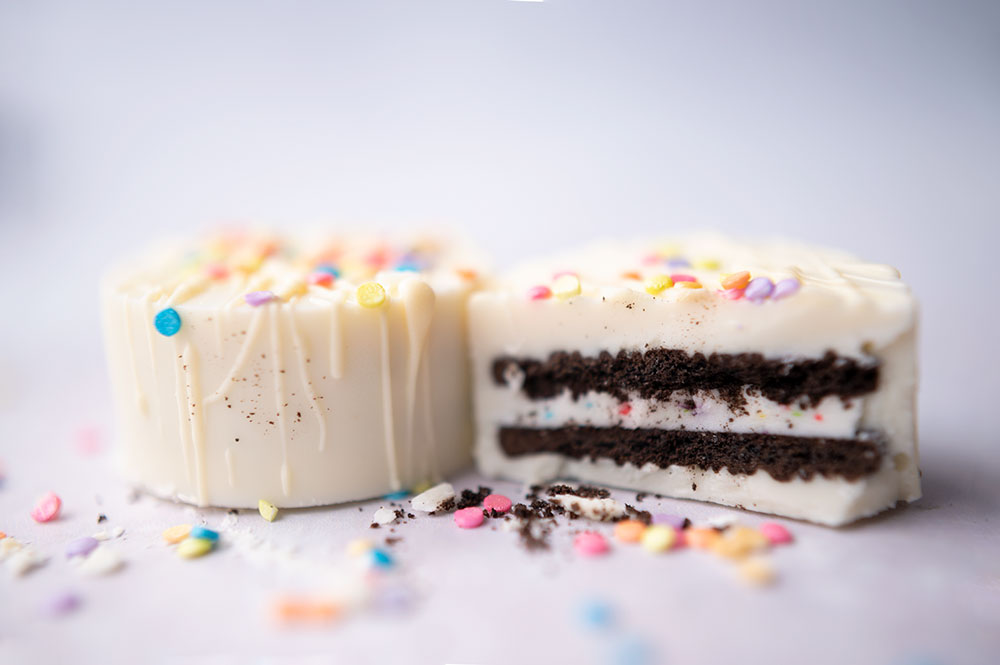
The secret to crafting beautiful, consistent white chocolate dipped Oreos is all in the specialty candy mold.
This particular candy mold is sized specially for Oreo cookies. It must be a popular item with bakeries and catering, because I saw a few of them on Amazon. They are silicon, so once your chocolate has hardened, you will basically turn the molds inside out to release the cookies. You don’t need to add anything to the molds to aid in release. Nothing sticks!
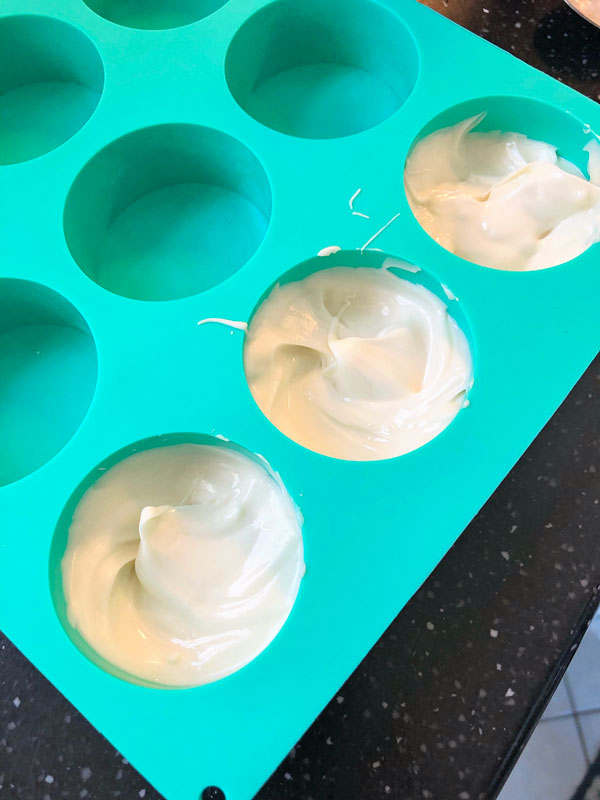
Step one is to put the melted chocolate into the candy molds.
What surprised me the most about this first step is that you put a LOT of chocolate into the molds. I filled mine more than half way and pressed some chocolate up the sides of the individual molds.
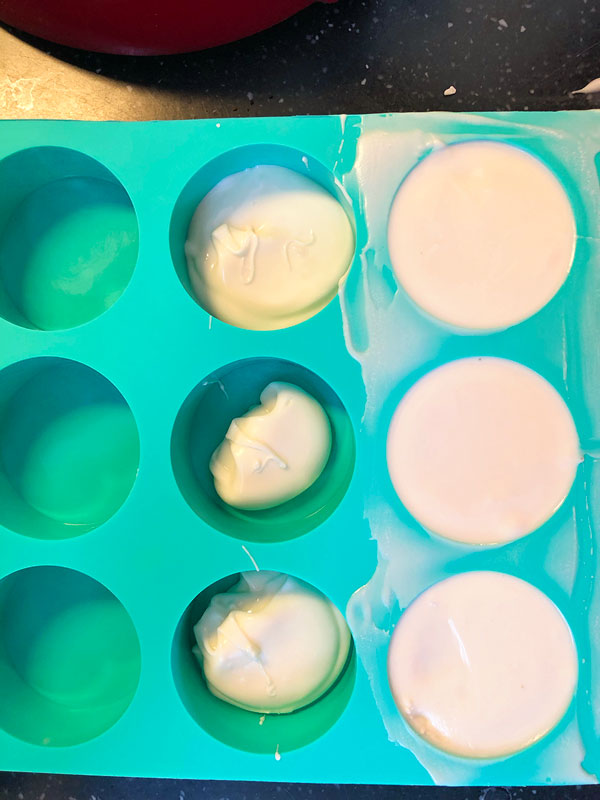
The wells on the far right are filled with cookies now and smoothed over.
Notice that the first row is filled and smoothed over. Those are cookies ready to start rehardening. The center wells are where I’m prepping for my next 3 cookies. See the middle well with only a little chocolate? That’s incorrect. You need a LOT more. Refer back to the previous photo to see how much you really need to add before the cookies go in.
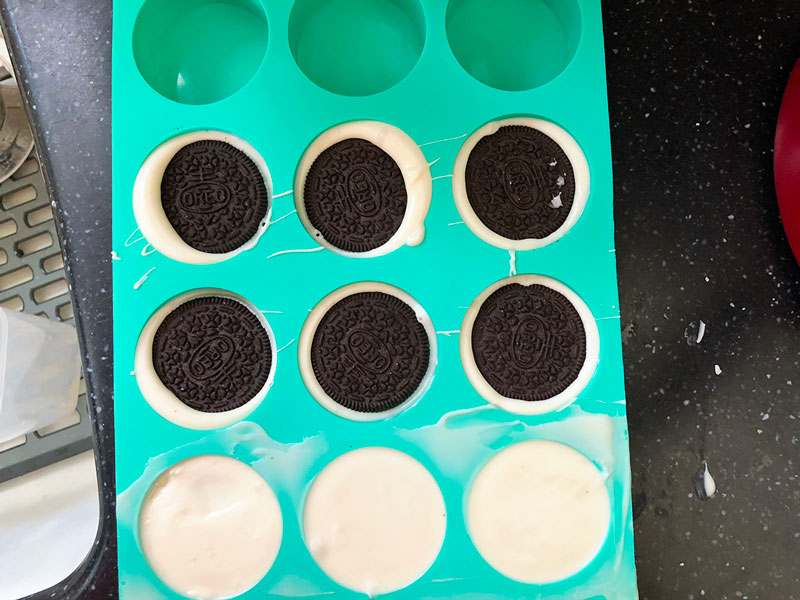
Cookies are in the chocolate wells.
As the mold is more than half way filled and the cookie is added, you will use your index and middle fingers to gently rock the cookie back and forth to make sure the chocolate works its way in between the chocolate cookies and starts coming over the top of the exposed cookie.
The key is to use a gentle motion.
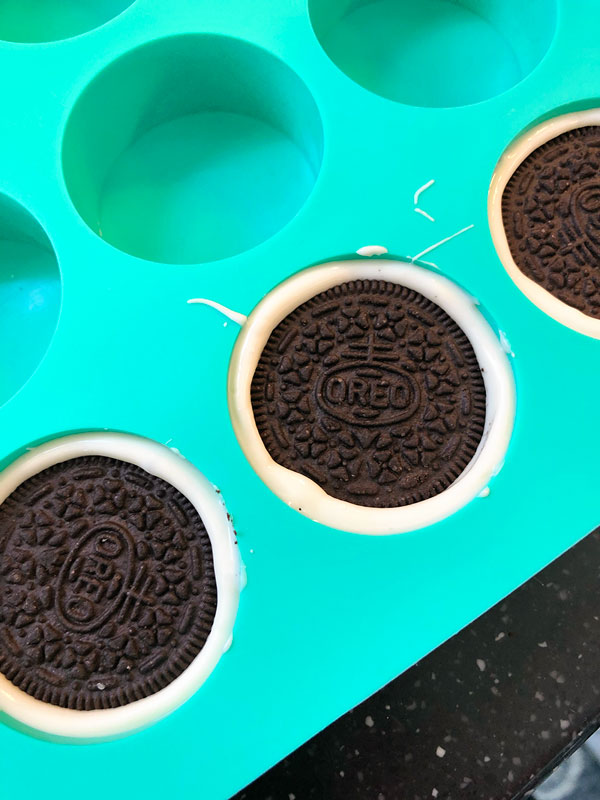
Notice how the rocking motion has worked the melted chocolate all the way around the cookie and over the sides of the cookie on top.
You are looking for that melted chocolate to work its way all the way around and over the lip of your cookie.
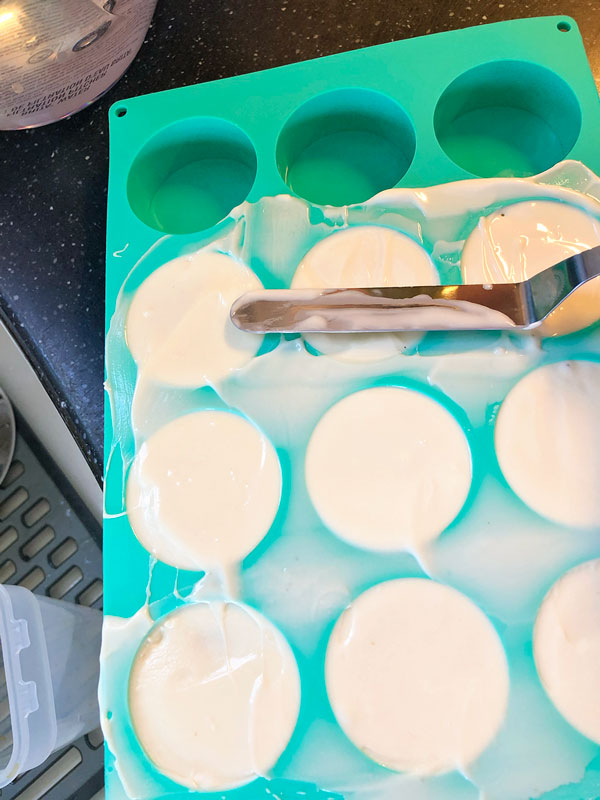
Add more melted chocolate to the top of your cookies so they are covered. Smooth it out with the offset spatula.
People want to be cheap and use a butter knife in this step. You can do that, but it’s not nearly as neat looking or as easy to do as if you had used the proper tool. A couple of sized of offset spatulas are a great addition to everyone’s baking supplies. They get used a LOT!
Last step once everything is covered is to pick the filled molds up and drop them on the countertop from a height of 8-10 inches. This will encourage air bubbles to the top and yield a smoother cookie surface.
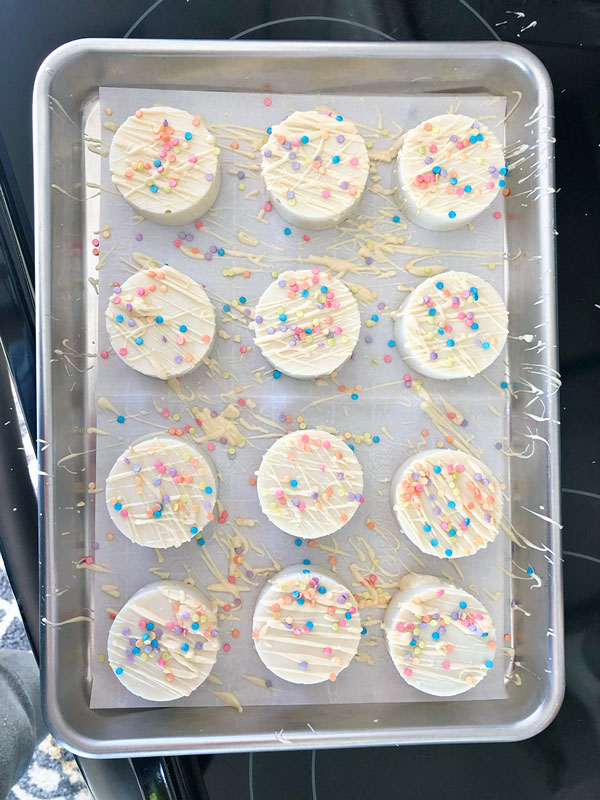
Leave the dipped cookies over night in a cool area so the chocolate rehardens. Turn the white chocolate dipped cookies out and decorate.
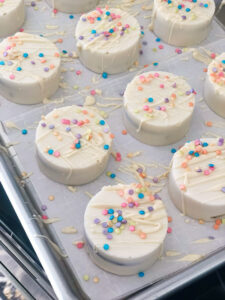
- Line a 1/4 sheet pan with parchment paper.
- Lay out the dipped cookies.
- Melt more chocolate, and using a fork, drizzle in a rapid back and forth motion over the dipped cookies.
- While the drizzle is wet, sprinkle the sprinkles over the top.
- Return cookies to a cool, dry space to dry.
Special considerations and questions:
Can I freeze chocolate dipped Oreos?
You can, but I would not recommend it. Start making this recipe 2 days before the event. Dip the cookies on the first day and let them set up over night. Then turn the dried cookies out and drizzle and decorate the second day. They can set up over night, or if you decorate in the morning, they will be ready for the afternoon.
Should I store chocolate covered Oreos in the refrigerator?
I would not recommend it because you run the risk of discoloration from condensation, bloom, etc. There is no reason why they shouldn’t stay fresh for 3 or more weeks if they are kept in an airtight container at a moderate room temperature.
What occasions can I serve dipped Oreos?
- Baby Showers
- Bridal Showers
- Bridal Receptions
- Birthday Parties
- Holiday Gatherings
Hopefully this takes some of the mystery out of making these lovely little treats at home. Putting a few bags of Oreo cookies and chocolate melts away for later in your medium term food pantry is a great way to always have something special on hand to share with those you love the most.

White Chocolate Dipped Oreos
- Total Time: 30 minutes
- Yield: 24 1x
Description
Looking for a super fancy treat to serve while still holding onto your budget? Wow your guests (or your family) with beautiful, professional looking cookies following a couple of simple steps
Ingredients
- Bag of your favorite Oreo Cookies
- 2 Bags of White Chocolate Melts. I always recommend Ghirardelli Melts
- Grapeseed Oil
- Pretty Sprinkles
Instructions
- Melt white chocolate using your preferred method. I always recommend a chocolate pot to melt chocolate for best results.
- Swirl in small amounts of grapeseed oil until chocolate reaches its desired consistency. Stir, stir, stir after each addition of oil to incorporate. If chocolate is too thin, add in a little more chocolate.
- Fill wells of candy mold a little over half way with melted chocolate
- Place one oreo cookie in each well .
- Gently press cookie into the chocolate and rock back and forth to coax chocolate over the top edges of the cookies.
- Cover tops of cookies with more melted chocolate and swipe away excess using a small offset spatula.
- Drop filled mold from about 10″ height onto counter 2 or 3 times to encourage air bubbles to rise to the top. This will yield smoother sides and sharper edges.
- Place filled molds in a cool, dry space for several hours, but overnight is best. This gives chocolate time to resolidify. Resist putting them into the refrigerator or freezer as this can cause bloom and ruin the look of the chocolate.
- Turn candy molds inside out to release dipped cookies once everything is resolidified.
- Place cookies on a sheet pan prepared with parchment paper.
- Melt more chocolate and thin to a thinner consistency for drizzling.
- Dip tines of a fork into the melted chocolate and with a rapid back and forth motion, drizzle melted chocolate in ribbons over the top of the dipped cookies.
- While drizzles are still wet, sprinkle decorations on top.
- Allow decorated cookies at least 4 hours to set up, but overnight is best. If not, make cookies a day ahead and decorate early the following morning. Allow them all day to set up before serving.
- Leftover cookies can be stored on the counter top for 3 weeks in an air tight container.
Notes
I used tone on tone chocolate for my decorations but you could also use a different chocolate OR colored candy melts for the drizzle. I personally prefer the taste of the white chocolate melts, so I would not dip my cookies in candy melts. It is difficult to color the white chocolate because it’s temperamental. It’s difficult to get the color the want and you run the risk of causing the chocolate to seize. So if you want color, candy melts are the best option for you.
The sharp edges and smooth sides of this cookie are due to the use of the specific candy mold. So if you want THIS look, you need to invest in the silicone candy mold to achieve it. You can lower the cookie into the melted chocolate and let them dry, but you will not achieve this look. If you want this beautiful result, you have to use the candy mold.
The most surprising thing about making this version of white chocolate dipped Oreo cookies is the sheer amount of chocolate it took to make them. You’ll notice I recommend two bags of chocolate melting wafer to make these cookies. That’s not a misprint. They used A LOT. So make sure you store several bags of all the flavors of the chocolate wafers in your pantry. It’s not life or death to have them, but it sure makes weathering the apocalypse a lot more pleasant.
- Prep Time: 30
- Category: Dessert
- Method: No Bake
- Cuisine: American