Diamond Quilt Block
Something you learn very quickly in quilt making is that there are generally several ways to make the same thing. Or multiple styles or versions of similar designs. In this post, let’s piece a Diamond Quilt Block constructed from half square triangles.
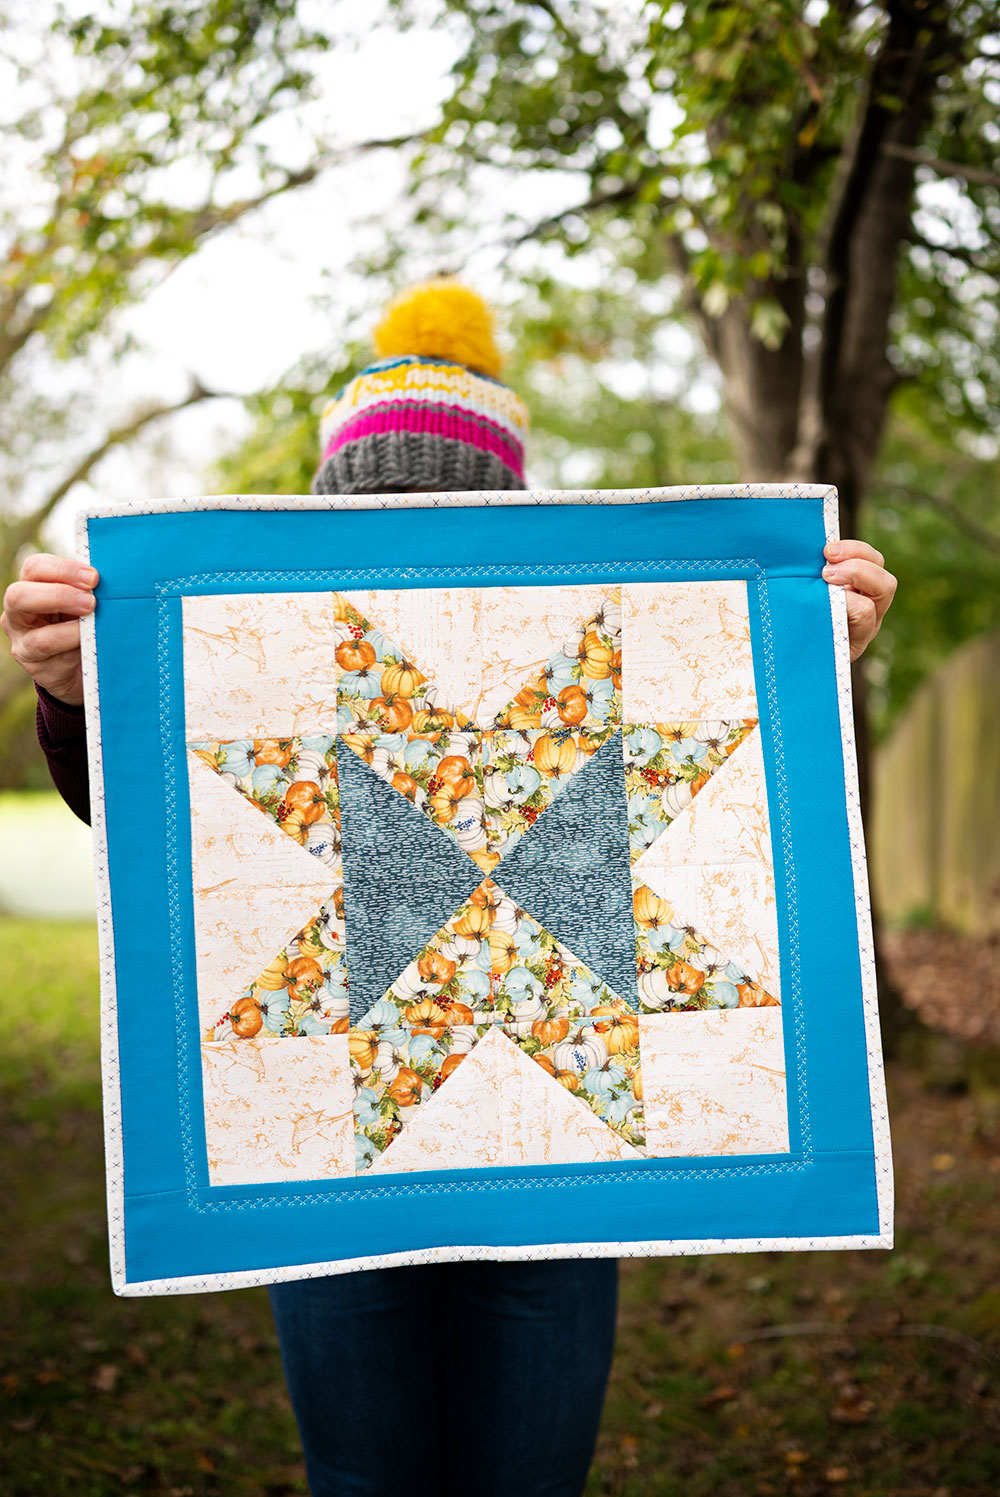
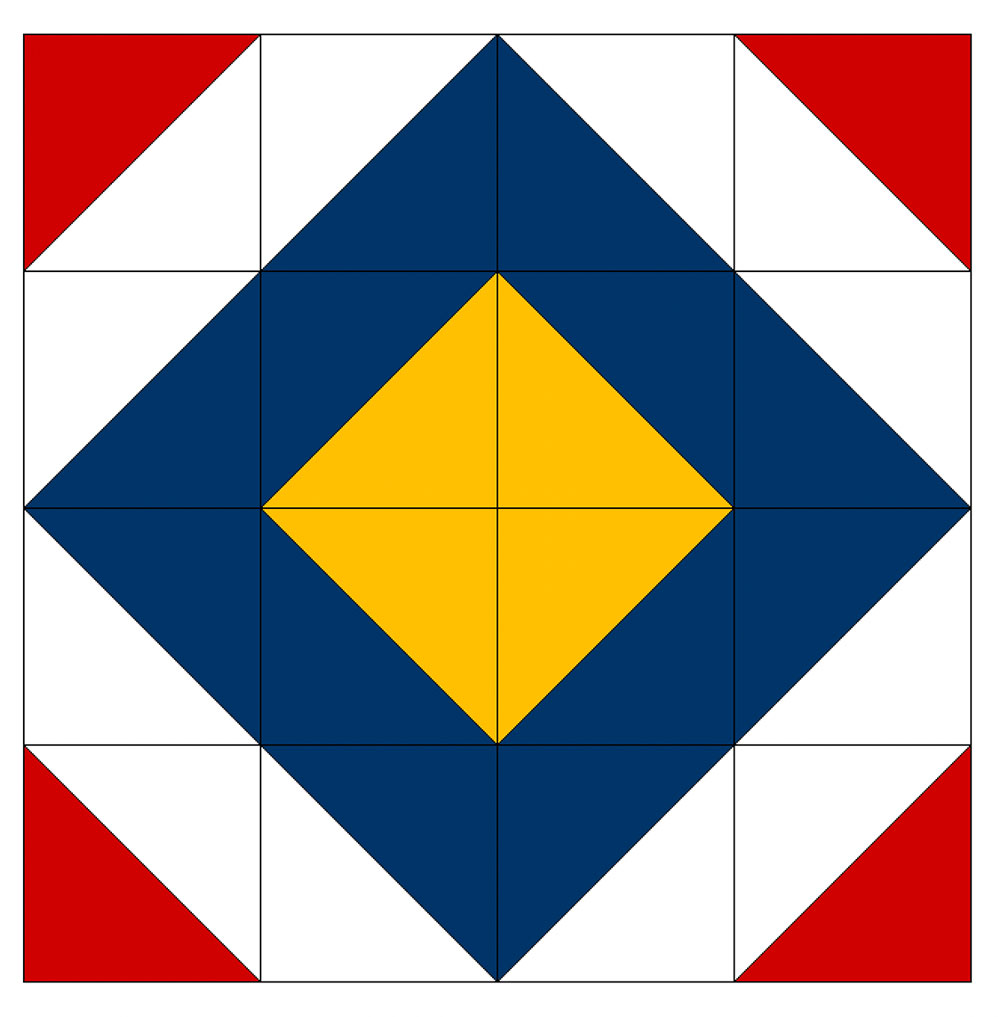
The Diamond Quilt Block being presented today is row 3 in the Power of 3 Row Quilt. So if you would like to construct the full quilt yourself you will want to complete 4 quilt blocks of each pattern presented. There are 5 in total. Here is the pattern I’ll be walking you through today. 💎 Continue to the end of the tutorial to find links to the introduction to the quilt design as well as the other blocks in the series.
All the blocks in this series are constructed to be 12″ finished blocks.
Row 1: The Sawtooth Star
Row 2: A Patriot’s Heart
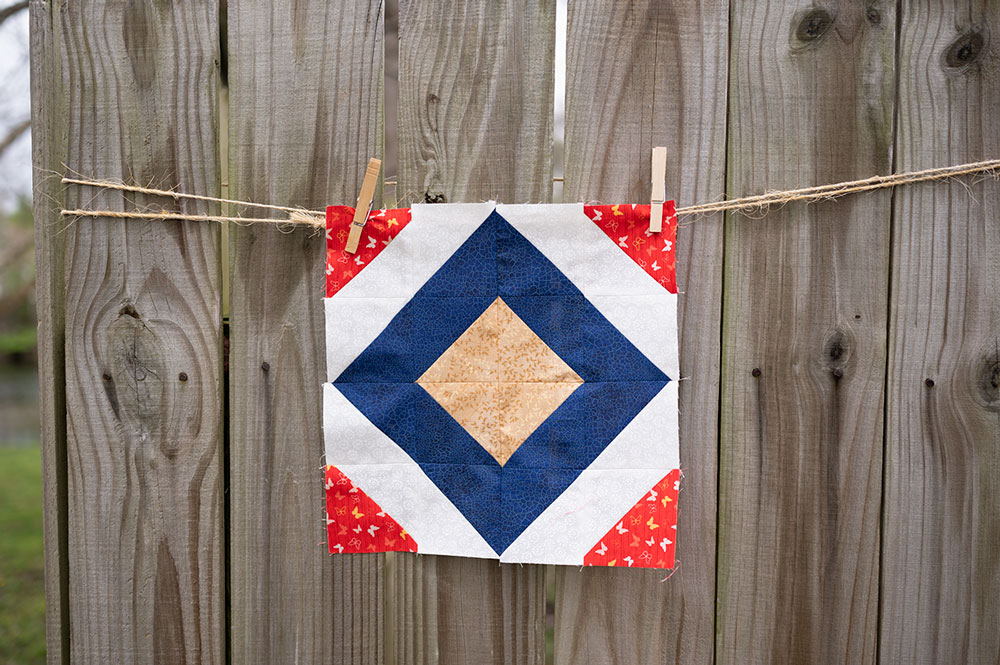
Row 3: The Diamond Block (today’s block)
Row 4: The Classic Pinwheel
Row 5: The Stair Step Block
Tips and tricks for constructing the Diamond Quilt Block:
- First of all, you need a strong HST game since the entire block is a series of 16 half square triangles pieced together. If you need a refresher on making them, or would like to see a tutorial on them, please visit that tutorial by clicking this link.
- The block as presented is part of the Power of 3 Row Quilt, so it uses a triadic color scheme (red, yellow and blue) plus a background fabric to reveal its shape.
- Take your time, be fresh and have plenty of light before trying to put this one together. I think it’s the most challenging block in the series to get right, because it has so many intersections where points have to line up. In fact, every seam has points to line up. So take your time.
- This block has very easy initial cutting instructions, because every square is cut (and trimmed) to the same size.
- The usual instructions for making half square triangles calls for cutting your initial squares 7/8s” over size to compensate for the seam allowance and squaring up. I find that measurement difficult….because well FRACTIONS. 🤔 So I size up a full inch to keep it easier for my brain to manage. And much easier to trim.
- Quilting always assumes a 1/4″ seam allowance. Always.
- Make your quilting easier by using the right tools for the job
- Rotary Cutter (affiliate link)
- Cutting mat (affiliate link)
- Square Rulers (affiliate link)
- Patriotic Fabrics (affiliate link)
- Really good iron (affiliate link)
Cutting Instructions for the HST Diamond ✂️
Color A (Blue):       6 - 4.5" Square
Color B (Red):        2 - 4.5" Square
Color C (Yellow):     2 - 4.5" Squares
Color D (White):      6 - 4.5" Squares
Let’s piece the block!
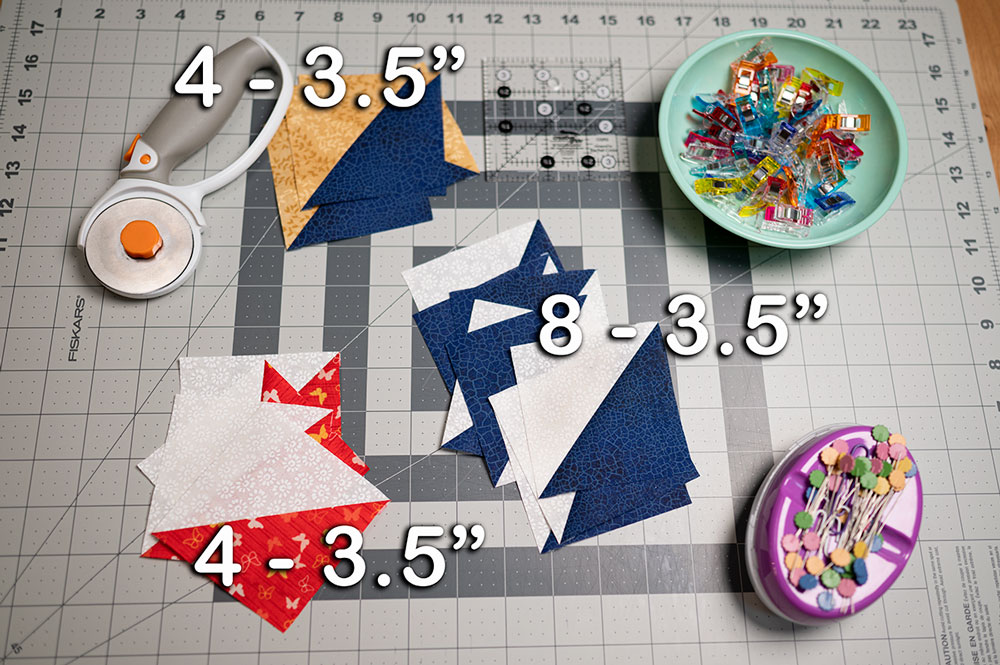
The first step is to construct and trim all the half square triangles.
- 4 Blue and Yellow HSTs (4 colors A & C)
- 4 Red and White HSTs (4 colors B & D)
- 8 Blue and White HSTs (8 colors A & D)
Construct and trim all the units down to 3.5″ which is the proper finished size to complete this 12″ block. Color D, or white, in this case is the background color.
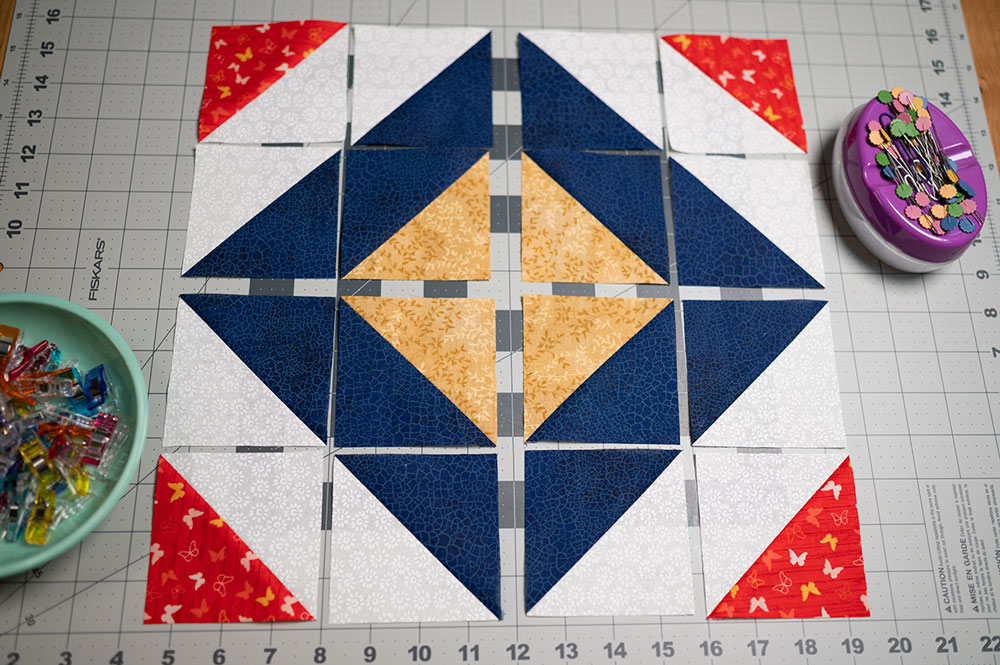
Lay the HSTs out to make the design.
Carefully laying all the trimmed HSTs out to form the pattern is important to understand the piecing strategy. It’s a lot of shapes and colors and could be easily confused, so we want to take it a step at a time.
Break the overall block down into easier units.
This version of diamond is a 16 patch quilt block which means there are four individual 4 Patch units. I think it’s easier to get a 4 patch set up than keeping track of 16 total blocks. So move your individual HSTs into 4 different quadrants to see that in reality, each quarter is the same pieced pattern rotated on the center point. 🤯
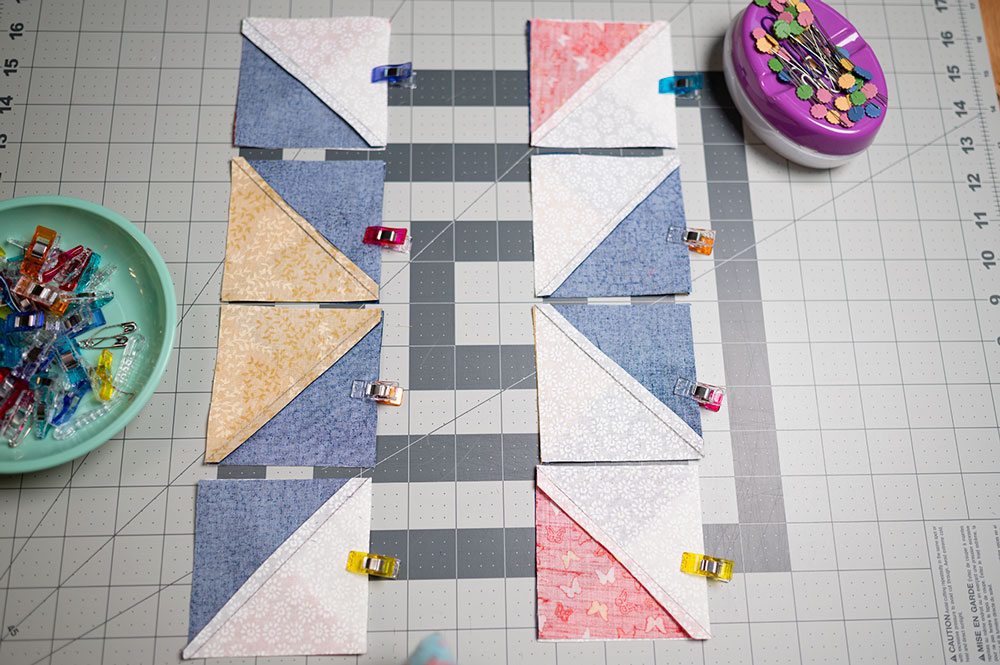
Chain piece the small units.
Flip the HST blocks right sides together, 2 at a time, and attach them together with wonder clips or using pins. The clipped side indicates where to sew. Run each unit through the sewing machine and press the 1/4″ seam allowance open. Even if you don’t need to attach the fabric together to sew a good seam, the clip is a visual reminder as to where the seam goes. It’s easy to sew on the wrong side and have to rip back, so save yourself some hassle.
Complete the 4 Patches
Now that the HSTs are pieced 2 together, return the pressed units to your work table and lay them out in their proper order. You could attach each unit together along the mid line and then sew the rows together. That’s a pretty standard method. I like to take my 16 patch blocks and construct each quadrant, and then put the quadrants together. I’m essentially constructing each quadrant as a 4 patch and then the whole block as another. I think it’s easier to get the points to line up this way.

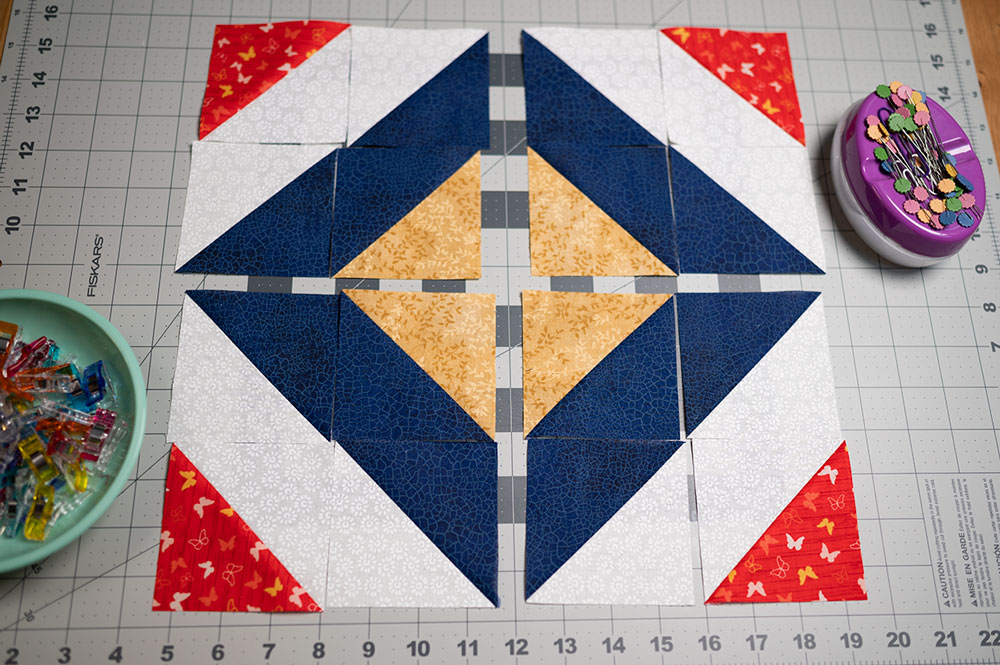
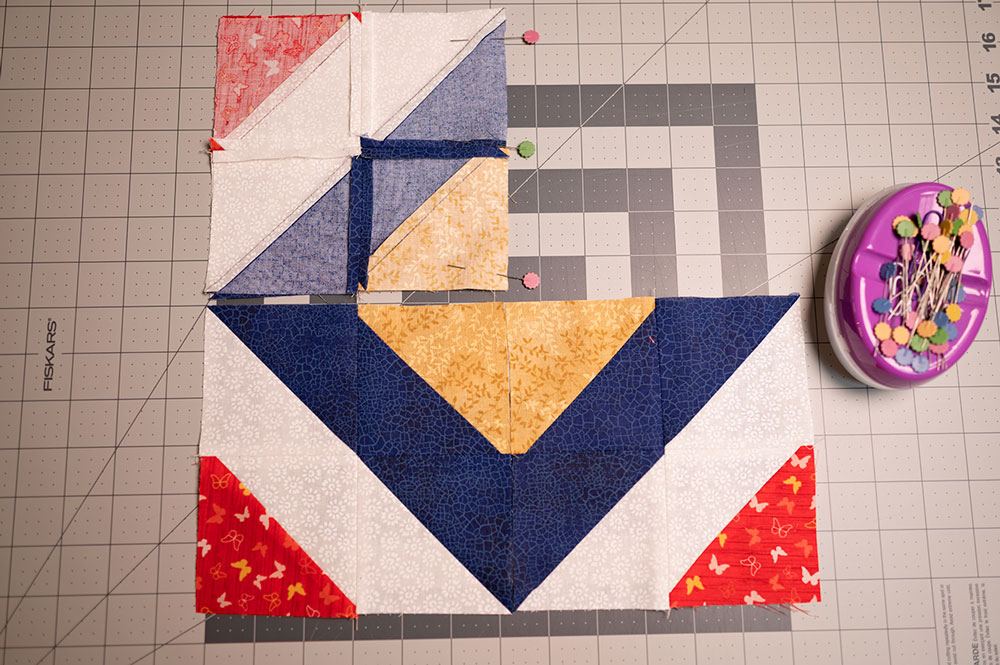
Prepare to piece each quadrant
Piecing like this, I only have one critical point to get right in each sewing line which is easier for me to achieve than a long row of seams that need to match. Every intersection in this block has points that need to match, so lining up the seams and seam allowances is critical to get the best result.
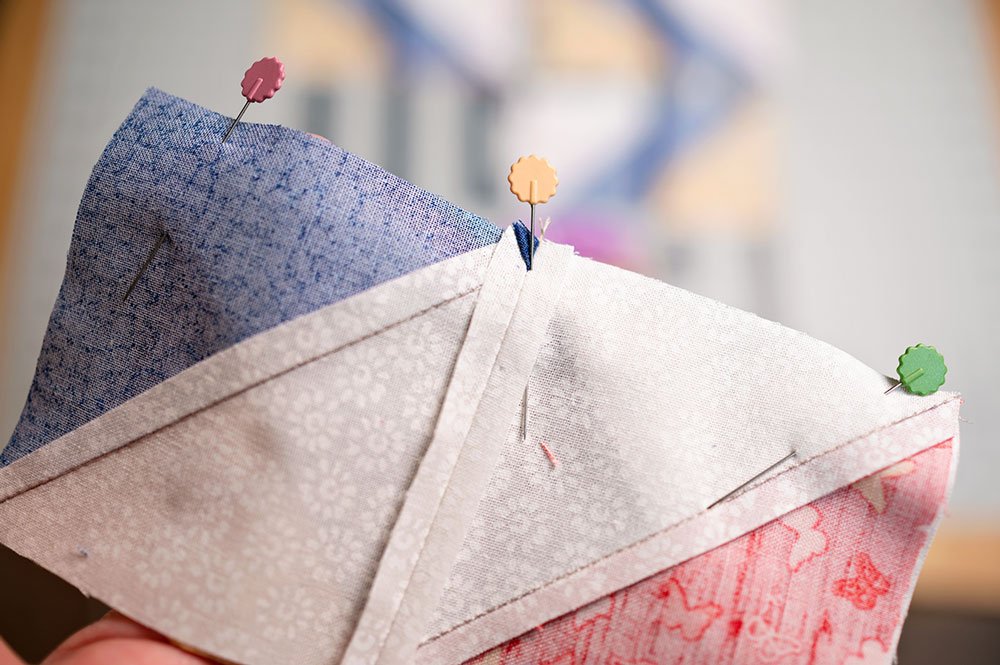
Pinning and seam allowances are critical.
While I love wonder clips, at this point in a project, I switch to pinning. The fabric does not shift and I have a better chance at having my center seam and points staying in place with careful pinning. I also pin the start and end points to keep fabric from shifting. By pressing the seam open where individual units are joined, I can better see my landmark for the point and be sure to sew just to the left of the point. See my full HST tutorial for more details if you need it.
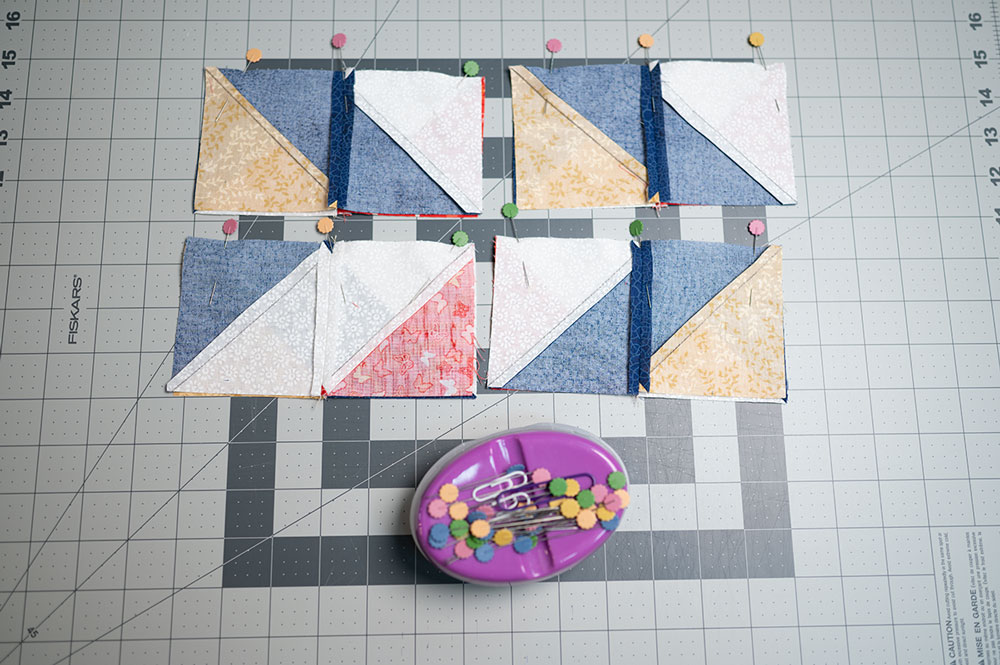
Chain piecing will save your time.
I pin each quadrant the same way so I can take them all to the machine to sew at once, one after another. It saves time and thread. When each four patch is sewn together, cut them apart and press the seams open.
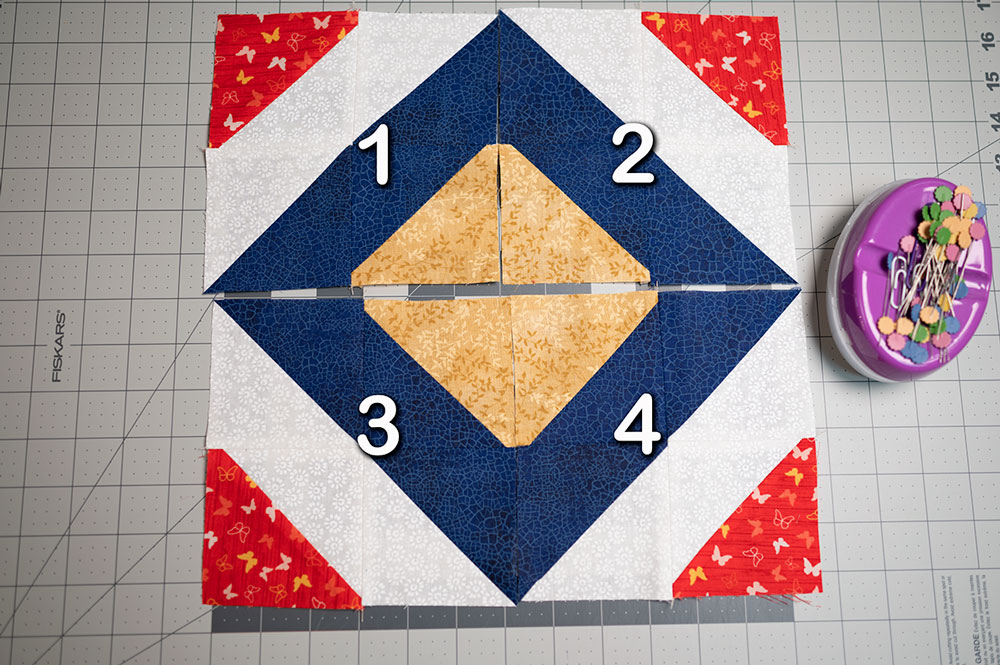
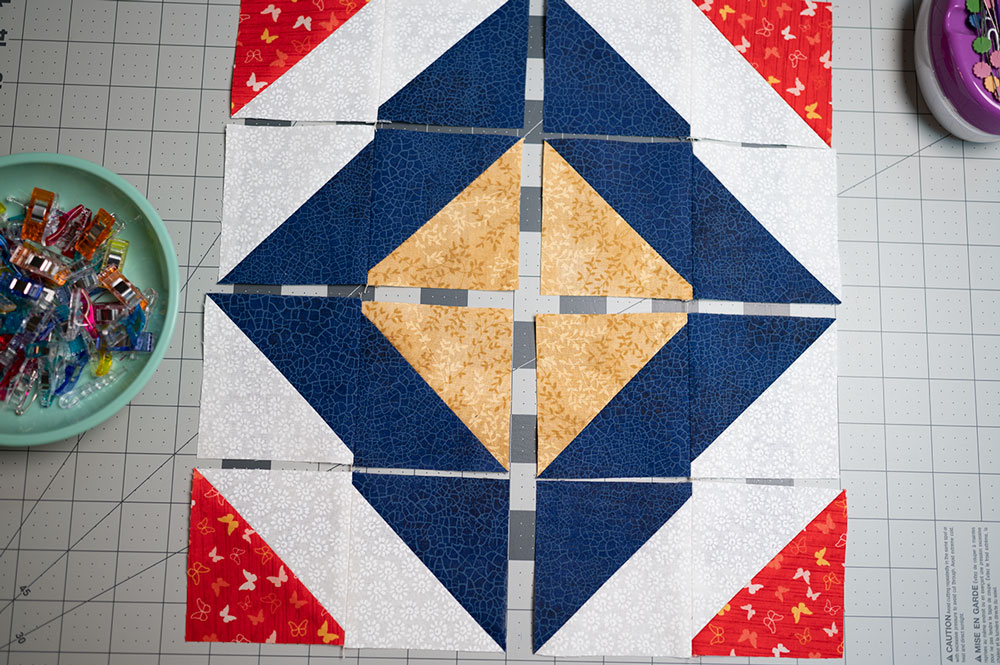
The 4 quadrants take shape
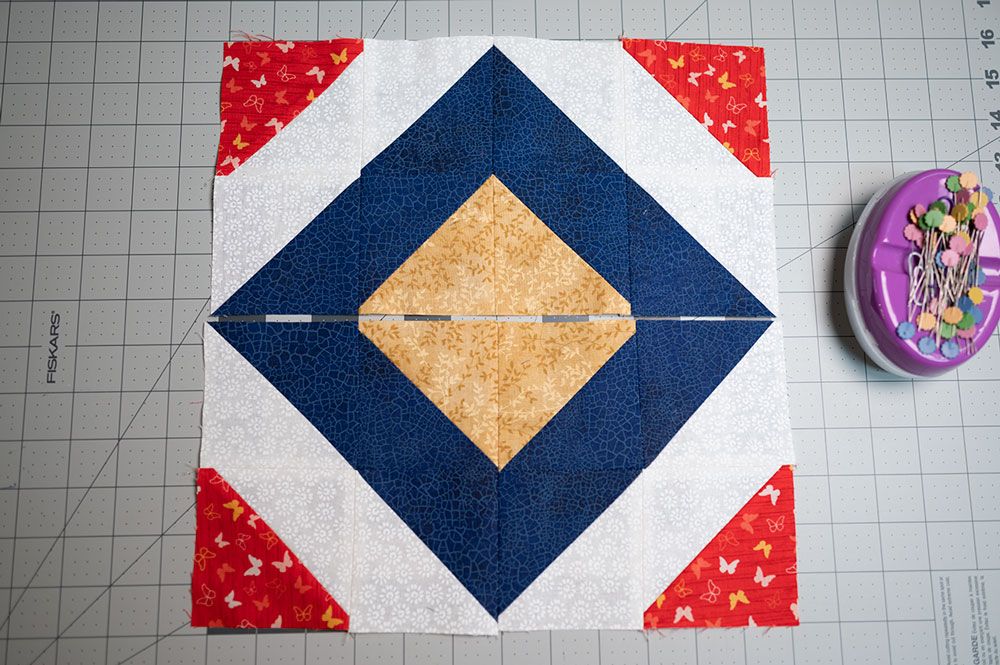
Now that we have our four 4 Patches made and pressed flat, lay them back out on your work surface. Notice the four quadrants. Also notice the center diamond looks a little funny. The flat ends are the seam allowances and with careful piecing, the points will emerge.
Sew the quadrants together along the north and south line.
Flipping the top and then the bottom halves right sides together and pinning in the same manner we have done with all the tother units means we only have that center point to get correct. In each step, we only have ONE point to line up and piece correctly. To me, one is easier to manage than multiple even if it takes me a little longer. Sew both top and bottom halves by chain piecing.. Press the center seam open.
One seam remaining!
The top and bottom halves are together. Time to sew them together along the midline line.

Time to sew the last seam in the Diamond Quilt block
Now we have the long row to sew when we connect the top and bottom halves together along the east/west orientation. Pin the center seam together first and then work your way out to each each end. Pin at each intersection to keep fabric from shifting and to be sure seams line up. Keep the accurate seam allowance of 1/4″ so points come together correctly. Press the last seam open.
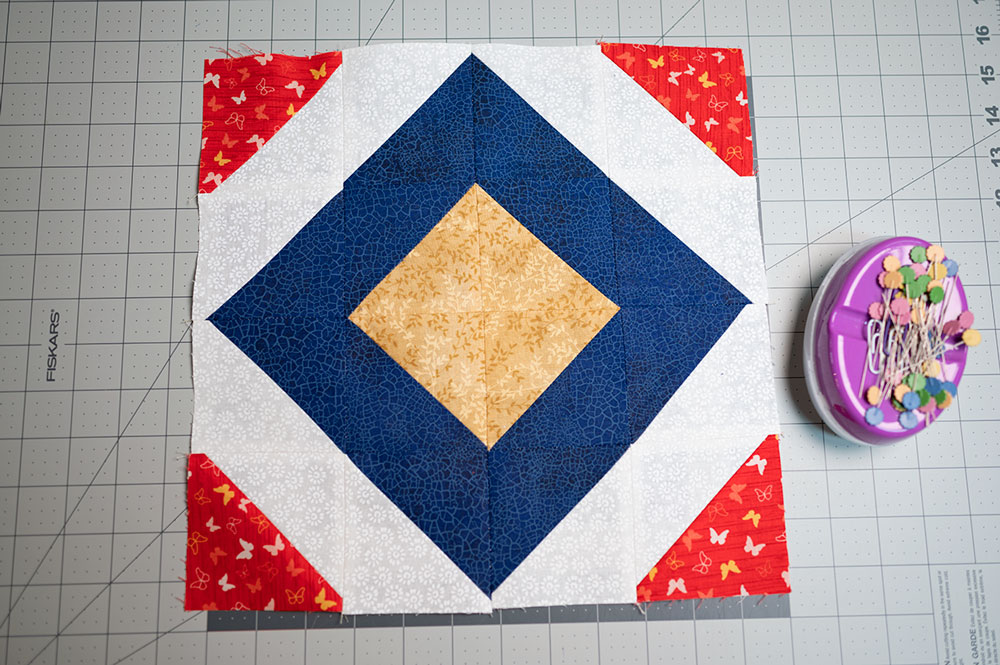
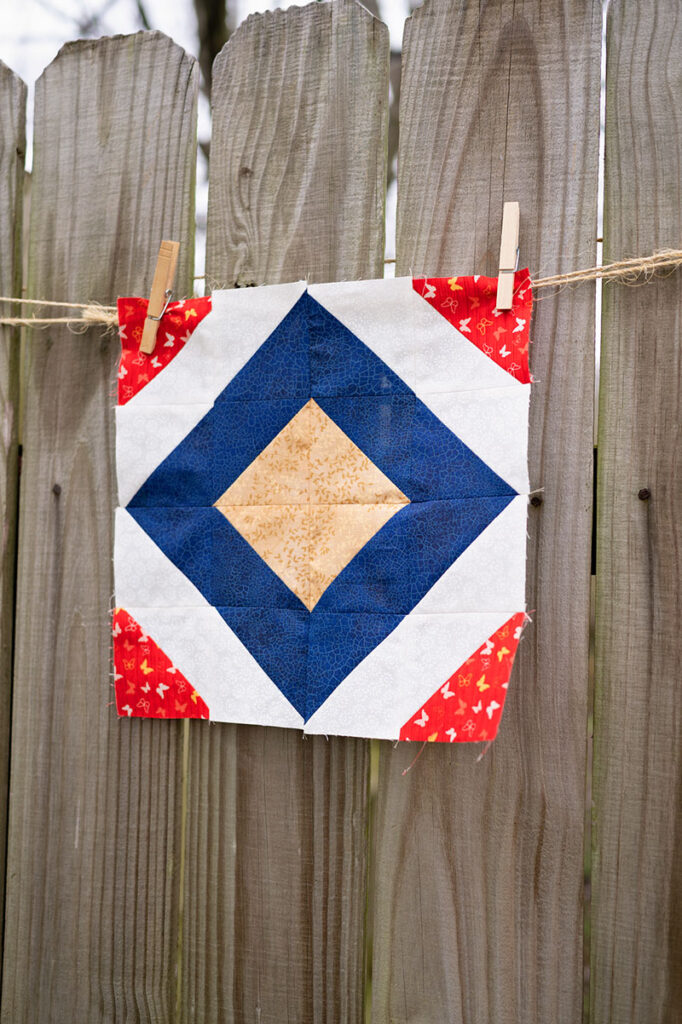
Voila! Your completed block!
This block is not quite perfect, but I wanted you to see it anyway. You always have the option to rip and sew again, or you can accept a less than perfect block as a design feature in your overall quilt.
Perfection in quilting is something HEAVILY pushed, and I would go so far as to say required 40 years ago. Some teachers still push students to strive for this goal.
And while it is a thing a beauty to have perfection in a completed block, I personally don’t think it’s a necessity. If you are entering a quilt into a competition where it will be judged, then of course the perfect execution is required. But as hobby quilters who are making these objects for personal enjoyment or to offer as gifts, I think getting caught up in perfectionism can take away some of the fun.
Certainly do your best. We should always strive to do our best.
But when the perfectionism leads to frustration and fatigue, it’s not really fun anymore, is it?
I think hobbies should be fun, not tedious. We all have jobs and responsibilities where we are placed under expectations and performance requirements. Don’t let that seep into your hobby and craft time. You should be experiencing a sense of freedom in your creative outlet and blowing off some of that steam!
If you can’t bear to have something less than perfection in your quilt top, then consider adding another 1/2 yard or so of each fabric to your front end purchase to give you extra fabric that allows for cutting and making a few extra blocks. Those orphaned blocks could be made into other projects, or save them and use them to practice quilting techniques. Making a few extras allows you freed to practice a new technique or block before committing to what you need for the actual project.
Joining in with us on the Power of 3 Row Quilt?
If you are making the full row quilt you’ll need the cutting instructions for the full row which appear below.
Cutting Instructions for the HST Diamond Row ✂️
Color A (Blue):       24 - 4.5" Square
Color B (Red):        8 - 4.5" Square
Color C (Yellow):     8 - 4.5" Squares
Color D (White):      24 - 4.5" Squares
You also need instructions for the other blocks:
- Power of 3 Row Quilt Introduction
- Row 1: Sawtooth Star
- Row 2: Patriot’s Heart
- Row 3: Diamond Block (that’s the post we’re on right now)
- Row 4: Classic Pinwheel
- Row 5: Stair Steps
Remember that in quilting, your wrong side is just as important as the front side. Carefully press your seams to give the flattest block possible. Since this block is in essence a four patch, nesting your seams for the top and bottom halves of the block work beautifully. I then pressed the center horizontal seam open to give me the flattest possible result.
Thanks for stopping by today! I hope you’ll piece your own Power of 3 Row Quilt where we explore the power of using 3 strong colors to create a cohesive color story for our quilt. Here is the illustration of the Patriot’s Heart Quilt block to help you see the construction.
Clicking On The Image Will Take You To A Full Size Version You Can Download For A Reference.
How to follow along with the Power of 3 Row quilt:
- I’ve designed this quilt around publishing a new block once a week. So you will see the instructions to construct each new block once a week. I’ll share the instructions to make one block as well as all 4 if you wish to construct a full row each week. I recommend making a full row each week and at the end of the 5th week, you have all the rows completed and joined.
- Be sure to subscribe to my youtube channel where we will be making a new block each week and I will also drop in with live check ins to see how everyone is progressing and to answer questions.
- Subscribe to my email list so you receive notification when the new block design publishes. 😀